Add an AWS organization
Chronom now supports automatic deployment of the CloudFormation stack across all accounts in your AWS organization. This guide explains how to use this feature through two options: using a Lambda function to auto-discover your root Organizational Unit (OU) Id, or manually supplying the root OU Id.
Feature Options
During CloudFormation stack deployment you can choose one of the following mutually exclusive options:
- Auto-Discover: Set the parameter
EnableAutoDiscovertotrue. This option triggers a Lambda function that automatically discovers your organization’s root OU id (This is done by clicking the 'Take me to AWS - Auto Discover' button). - Manual Input: Supply the parameter
RootOuIdwith your organization's root OU id during deployment.
Do not set both options simultaneously.
How It Works
Auto-Discover Option
When you enable EnableAutoDiscover, a Lambda function is triggered at deployment which:
- Connects to AWS Organizations.
- Discovers the root OU id automatically.
- Uses the discovered id to deploy the CloudFormation StackSet across all accounts.
Manual Input Option
If you choose not to use auto-discovery, you must manually find and provide your organization’s root OU id. Follow these steps:
-
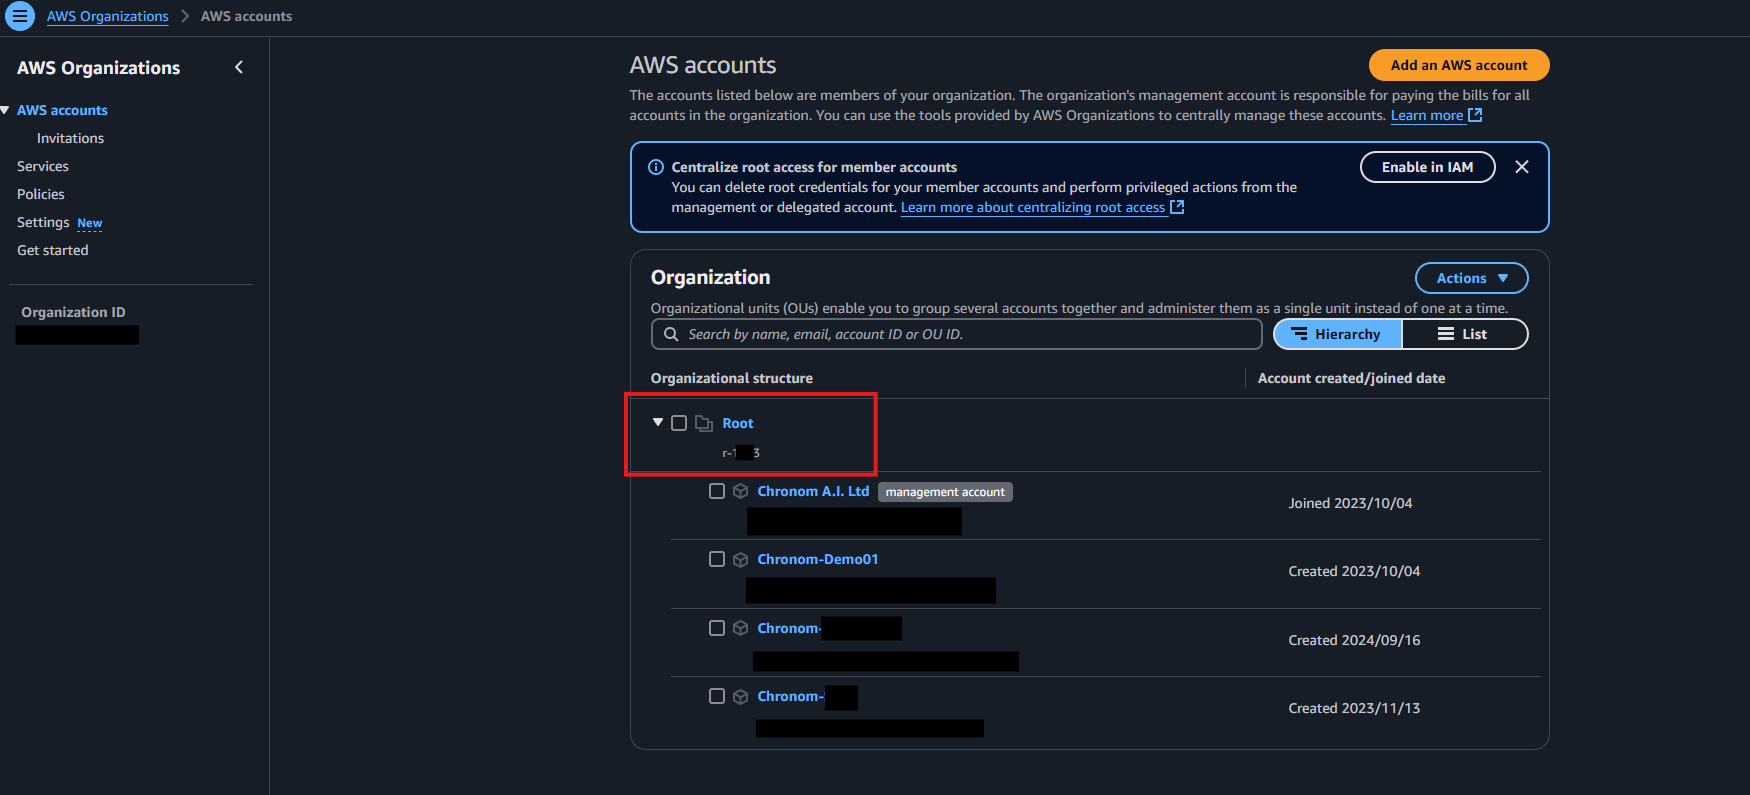
Open the AWS Organizations Console:
- Sign in to the AWS Management Console and open AWS Organizations.
-
Locate Your Root OU:
- In the left-hand navigation pane, click on "Organizational units."
- Identify the root OU. It is usually labeled “Root” or it carries your organization’s name.
-
Copy the Root OU Id:
- Click on the root OU to view its details.
- Copy the OU id provided in the details section.
IAM Role Details
The CloudFormation template creates an IAM role with the following permissions:
ReadOnlyAccess- A built-in AWS policy that grants read-only access to most of the AWS resources.ChronomReadonlyAdditionalAccessPolicy- A custom policy to grant access to additional resources required by Chronom.
(For more detailed information about the IAM role and its permissions, please refer to the Add an AWS account documentation.)
Organization Template Checksum
For security verification, you can verify the organization-level CloudFormation template:
- SHA256:
426c2c783ac6545ec0e7fb77de21337184ee3f7891b297b4dfa6765c6658bad1
To verify the organization template:
# Get the policy ARN (replace account-id and policy name as needed)
aws iam get-policy --policy-arn arn:aws:iam::YOUR-ACCOUNT-ID:policy/ChronomReadonlyAdditionalAccessPolicy

# Get the policy version document and calculate checksum (canonical JSON)
aws iam get-policy-version --policy-arn arn:aws:iam::YOUR-ACCOUNT-ID:policy/ChronomReadonlyAdditionalAccessPolicy --version-id v1 --query PolicyVersion.Document --output json | jq -c -j | sha256sum
Or see the Add an AWS account documentation for more details. :::
Pre-requisites and Warnings
- Activate Trusted Access for StackSets: Before deploying organization-wide, you must activate trusted access for StackSets with AWS Organizations. This is required for the CloudFormation StackSet to deploy across accounts in your organization. See instructions below.
- IAM Permissions: Ensure the deploying user has the necessary IAM permissions.
(For a detailed list of required permissions, please refer to the Add an AWS account documentation.) - Understanding Your Organization: Only use this feature if you are familiar with your AWS organization's structure. Incorrect OU ids could lead to deployment to unintended accounts and data leakage.
- For Advanced Users: This feature is intended for Managed Service Provider employees or users with advanced knowledge of AWS organizational structures.
- Configuration Validation: Always verify your parameter settings (either
EnableAutoDiscoverorRootOuId) before deploying the stack, to avoid configuration conflicts. - Target Account: Ensure that the account you are deploying to is the Management account or has the necessary permissions to deploy the stack across the organization.
Activate Trusted Access for StackSets
Before deploying the CloudFormation StackSet across your organization, you must activate trusted access for StackSets with AWS Organizations. This allows CloudFormation to create service-linked roles and deploy resources across all accounts in your organization.
You must complete this step as an administrator user in the management account before proceeding with the deployment instructions below.
Prerequisites for Trusted Access
- You must have all features enabled in AWS Organizations (not just consolidated billing)
- You must be signed in as an administrator user in the management account
Steps to Activate Trusted Access
-
Sign in to the Management Account:
- Sign in to AWS as an administrator of the management account and open the CloudFormation console.
-
Navigate to StackSets:
- From the navigation pane, choose StackSets.
- If trusted access is deactivated, you'll see a banner that prompts you to activate trusted access.
-
Activate Trusted Access:
- Choose Activate trusted access.
- Trusted access is successfully activated when you see a confirmation banner.
Alternative: Using AWS CLI
You can also activate trusted access using the AWS CLI:
# Activate trusted access for StackSets
aws cloudformation activate-organizations-access --region us-east-1

# Verify trusted access is activated
aws cloudformation describe-organizations-access --region us-east-1
For more detailed information about trusted access activation, see the AWS CloudFormation StackSets documentation.
Deployment Instructions
AWS Console
Before proceeding with the deployment steps below, ensure you have activated trusted access for StackSets in your AWS Organization.
To use the CloudFormation template, Follow the steps below:
-
Sign in to Chronom.
-
If you manage multiple organizations (MSP), select the desired organization using the organization switcher.
-
Go to Settings.
-
Go to the AWS Accounts tab
-
Click on Connect a new account
-
When the menu opens click on Take me to AWS - Auto Discover
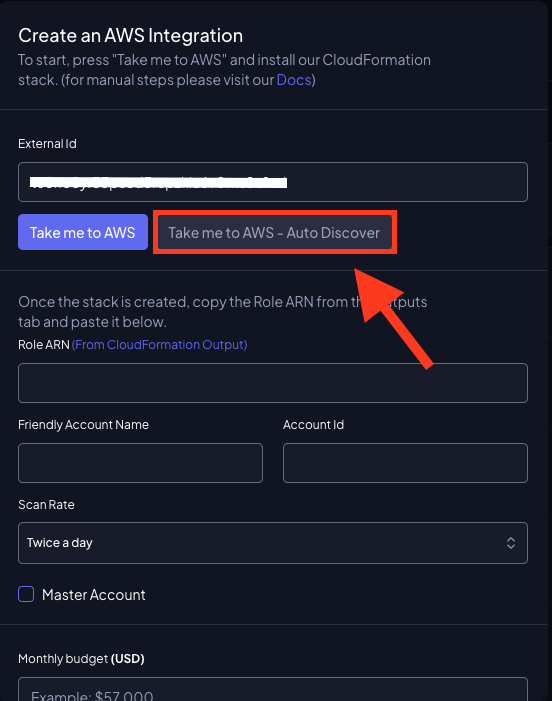
-
Create the stack that you got directed to (Make sure not to change anything!)
-
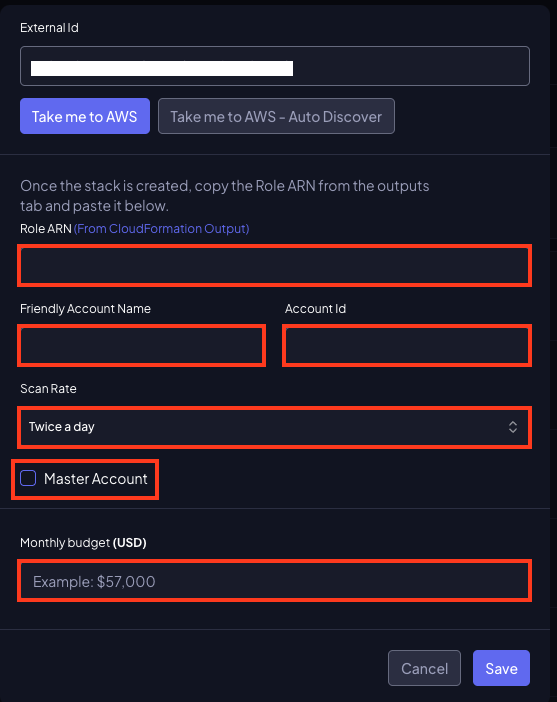
When the stack completes, go to the Outputs tab and copy the ManagementRoleArn value.
-
Go back to the add AWS account menu and paste:
- The Role ARN into the Role ARN field.
- Your account name in the Friendly Account Name field.
- Your account ID in the Account Id field.
- Your scan rate from the drop-down menu.
- Don't change the master account box it's auto-detectable.
- Fill your Monthly budget (in USD)
-
Click Save to add your AWS account.
Using the AWS CLI
Before running the CLI commands below, ensure you have activated trusted access for StackSets in your AWS Organization.
If preferred, you can deploy using the AWS CLI by including your chosen parameter in the command:
-
Sign in to Chronom.
-
If you manage multiple organizations (MSP), select the desired organization using the organization switcher.
-
Go to Settings.
-
Go to the AWS Accounts tab
-
Click on Connect a new account
-
Open a terminal that has the AWS CLI installed and choose a way to deploy the stack:
- For auto-discovery:
aws cloudformation create-stack \
   --stack-name ChronomReadOnlyRole \
   --template-url https://chronom-public-assets.s3.amazonaws.com/org-level-readonly-role.yaml \
   --parameters ParameterKey=chronomExternalId,ParameterValue=EXTERNAL_ID ParameterKey=EnableAutoDiscover,ParameterValue=true \
   --capabilities CAPABILITY_NAMED_IAM \
--region us-east-1- For manual input:
YOUR_ROOT_OU_ID=$(aws organizations list-roots --query "Roots[0].Id" --output text)

aws cloudformation create-stack \
      --stack-name ChronomReadOnlyRole \
      --template-url https://chronom-public-assets.s3.amazonaws.com/org-level-readonly-role.yaml \
      --parameters ParameterKey=chronomExternalId,ParameterValue=EXTERNAL_ID ParameterKey=RootOuId,ParameterValue=$YOUR_ROOT_OU_ID \
      --capabilities CAPABILITY_NAMED_IAM \
      --region us-east-1
Replace
EXTERNAL_IDandYOUR_ROOT_OU_IDwith your actual values. -
When the stack completes, Copy the ManagementRoleArn value.
-
Go back to the add AWS account menu and paste:
- The Role ARN into the Role ARN field.
- Your account name in the Friendly Account Name field.
- Your account ID in the Account Id field.
- Your scan rate from the drop-down menu.
- Don't change the master account box it's auto-detectable.
- Fill your Monthly budget (in USD)
-
Click Save to add your AWS account.