Add an AWS account
To deploy the stack organization‑wide (using Lambda auto-discover for the root OU id or by manually specifying it), please refer to our Organization Deployment Guide.
Chronom uses a read-only IAM Role to collect data from your AWS account.
To make it easier for you to add your AWS account to Chronom, we have created a CloudFormation template that will help you create the IAM Role and add it to Chronom in a few simple steps.
(You can use the AWS Management Console or the AWS CLI to create the stack.)
Permissions
The readonly-role.yaml CloudFormation template creates an IAM role that allows Chronom to assume the role with an external id.
The role has two IAM policies attached to it:
-
ReadOnlyAccess- A built-in AWS policy that grants read-only access to most of the AWS resources. -
ChronomReadonlyAdditionalAccessPolicy- A custom Policy to grant access to the following additional resources:eks:AccessKubernetesApi- To allow access to the EKS cluster API server (For Kubernetes resource Scanning).ecs:GetTaskProtection- To allow access to ECS task protection Information (For ECS resource Scanning).ce:StartSavingsPlansPurchaseRecommendationGeneration- To allow Chronom to generate Savings Plans recommendations (For Cost Explorer resource Scanning).aws-marketplace:SearchAgreements- To allow Chronom to search for AWS Marketplace agreements (For AWS Marketplace resource Scanning).aws-marketplace:Describe*- To allow Chronom to describe AWS Marketplace products (For AWS Marketplace resource Scanning).aws-marketplace:List*- To allow Chronom to list AWS Marketplace products (For AWS Marketplace resource Scanning).aws-marketplace:View*- To allow Chronom to view AWS Marketplace products (For AWS Marketplace resource Scanning).aws-marketplace:Get*- To allow Chronom to get AWS Marketplace products (For AWS Marketplace resource Scanning).ebs:ListSnapshotBlocks- To allow Chronom to list EBS snapshot blocks (For EBS Snapshot Scanning).
IAM Policy Checksums
For security verification purposes, you can use the following checksums to verify that the scanner's role permissions match the expected policy:
ChronomReadonlyAdditionalAccessPolicy Checksum
- Policy Document SHA256:
426c2c783ac6545ec0e7fb77de21337184ee3f7891b297b4dfa6765c6658bad1
To verify your deployed policy matches the expected permissions:
Compare the policy document checksum:
# Get the policy ARN (replace account-id and policy name as needed)
aws iam get-policy --policy-arn arn:aws:iam::YOUR-ACCOUNT-ID:policy/ChronomReadonlyAdditionalAccessPolicy

# Get the policy version document and calculate checksum (canonical JSON)
aws iam get-policy-version --policy-arn arn:aws:iam::YOUR-ACCOUNT-ID:policy/ChronomReadonlyAdditionalAccessPolicy --version-id v1 --query PolicyVersion.Document --output json | jq -c -j | sha256sum
Prerequisites
In order to use this CloudFormation template, you need to have the following:
-
An external id that is provided during the Account Registration process in Chronom.
-
Access to an AWS account with the following permissions:
-
IAM Roles & Policies (Required):
iam:CreateRoleiam:AttachRolePolicyiam:PutRolePolicyiam:DeleteRoleiam:DetachRolePolicyiam:TagRoleiam:CreatePolicyiam:DeletePolicy
-
Lambda Function Management (Optional – only required for organization level deployment):
lambda:CreateFunctionlambda:UpdateFunctionConfigurationlambda:UpdateFunctionCodelambda:GetFunctionlambda:InvokeFunction
-
CloudFormation StackSet Management (Optional – only required for organization level deployment):
cloudformation:CreateStackSetcloudformation:DeleteStackSetcloudformation:UpdateStackSetcloudformation:DescribeStackSetcloudformation:DescribeStackSetOperationcloudformation:ListStackSetscloudformation:CreateStackInstancecloudformation:DeleteStackInstancecloudformation:DescribeStackInstancecloudformation:ListStackInstances
-
CloudFormation Stack Management (Optional – only required for organization level deployment):
cloudformation:CreateStackcloudformation:UpdateStackcloudformation:DeleteStackcloudformation:DescribeStacks
-
Usage
AWS Console
The deployment below is for one AWS account only! To deploy the stack organization‑wide (using Lambda auto-discover for the root OU id or by manually specifying it), please refer to our Organization Deployment Guide.
To use the CloudFormation template, Follow the steps below:
-
Sign in to Chronom.
-
If you manage multiple organizations (MSP), select the desired organization using the organization switcher.
-
Go to Settings.
-
Go to the AWS Accounts tab
-
Click on Connect a new account
-
When the menu opens click on Take me to AWS

-
Create the stack that you got directed to (Make sure not to change anything!)
-
When the stack completes, go to the Outputs tab and copy the ChronomReadonlyRoleArn value.
-
Go back to the add AWS account menu and paste:
- The Role ARN into the Role ARN field.
- Your account name in the Friendly Account Name field.
- Your account ID in the Account Id field.
- Your scan rate from the drop-down menu.
- Don't change the master account box it's auto-detectable.
- Fill your Monthly budget (in USD)
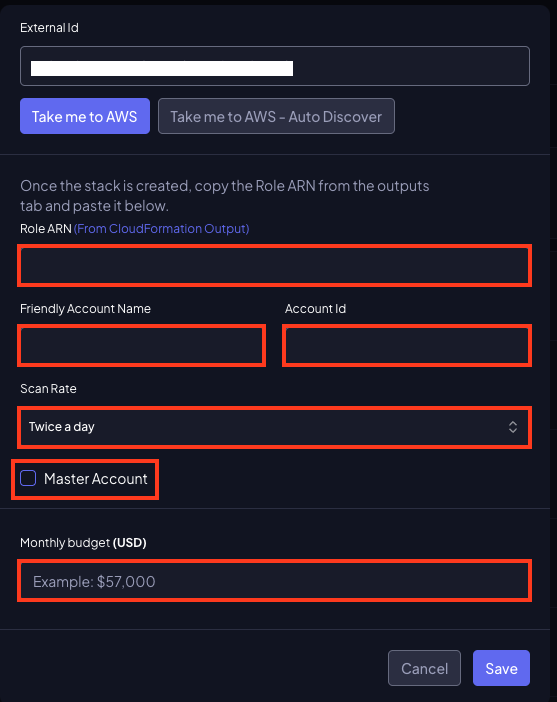
-
Click Save to add your AWS account.
AWS CLI
To use the readonly-role.yaml CloudFormation template using the AWS CLI, follow the steps below:
-
Sign in to Chronom.
-
If you manage multiple organizations (MSP), select the desired organization using the organization switcher.
-
Go to Settings.
-
Go to the AWS Accounts tab
-
Click on Connect a new account
-
Open a terminal that has the AWS CLI installed and configured with the necessary permissions.
(We recommend using AWS CloudShell for this process. It comes pre-installed with the AWS CLI and has the necessary permissions to create the stack.) -
Run the following command to create the stack:
noteReplace
EXTERNAL_IDwith the External Id provided by Chronom.aws-cli# Replace EXTERNAL_ID with the External Id provided by Chronom
ChronomExternalId=EXTERNAL_ID
# Create the stack
stackId=$(aws cloudformation create-stack --stack-name ChronomReadOnlyRole --template-url https://chronom-public-assets.s3.amazonaws.com/org-level-readonly-role.yaml --parameters ParameterKey=chronomExternalId,ParameterValue=$ChronomExternalId --capabilities CAPABILITY_NAMED_IAM --query "StackId" --output text --region us-east-1)
# Wait for the stack to complete
aws cloudformation wait stack-create-complete --stack-name $stackId
# Output the RoleArn
echo "Role ARN:";aws cloudformation describe-stacks --stack-name $stackId --query "Stacks[0].Outputs[?OutputKey=='ChronomReadonlyRoleArn'].OutputValue" --output text;echoThe command will create the stack and wait for it to complete (Approximately two minutes). Once the stack is created, it will output the
RoleArnthat you need to insert into Chronom. -
Go back to the add AWS account menu in Chronom and paste:
- The Role ARN into the Role ARN field.
- Your account name in the Friendly Account Name field.
- Your account ID in the Account Id field.
- Your scan rate from the drop-down menu.
- Don't change the master account box it's auto-detectable.
- Fill your Monthly budget (in USD)
-
Click Save to add your AWS account.
Deletion
Deleting the stack will result in the removal of the IAM Role and its associated policies.
This action will cause Chronom to lose access to your AWS account, rendering all data unavailable.
If for any reason you need to delete the role, you should delete the CloudFormation stack that was created using the readonly-role.yaml template using the CLI or the AWS console.