Microsoft 365 Integration
This guide should only be performed once per Microsoft 365 Tenant.
The App Registration should be created in the same tenant where your Microsoft 365 licenses are managed.
In order to allow Microsoft 365 License optimization, you must grant admin consent for all the permissions listed in Step 2 below - including Directory.Read.All, Agreement.Read.All, AuditLog.Read.All, Reports.Read.All, Sites.Read.All, TermStore.Read.All, DeviceManagementApps.Read.All, DeviceManagementConfiguration.Read.All, DeviceManagementManagedDevices.Read.All, DeviceManagementServiceConfig.Read.All, eDiscovery.Read.All, InformationProtectionPolicy.Read, SecurityEvents.Read.All, and MailboxSettings.Read.
This guide will walk you through the process of creating an Azure App Registration for Chronom's M365 integration in your Azure Tenant.
Prerequisites
In order to create a new Azure App Registration, you need the following prerequisites:
- An Active Azure Tenant.
- The following permissions Microsoft Entra ID Permissions:
microsoft.directory/applications/createAsOwnermicrosoft.directory/oAuth2PermissionGrants/createAsOwnermicrosoft.directory/servicePrincipals/createAsOwnermicrosoft.directory/servicePrincipals/managePermissionGrantsForAll.microsoft-company-admin(the listed permissions are part of theApplication Administratorrole)
- If you have Conditional Access Policies enabled, you need to ensure that the App Registration can bypass the policies.
(Please contact our support for more information)
Step 1: Create the App Registration
- Azure Portal
- Azure CLI (bash)
- Azure CLI (PowerShell)
-
Browse to the Application Registration Creation page in the Azure Portal.
(Make sure you are logged in to the correct Azure Tenant)tipIf the link does not work, you can navigate to the
Entra IDservice and click on theApp registrationssection inside Azure Portal,
then click on the+ New registrationbutton. -
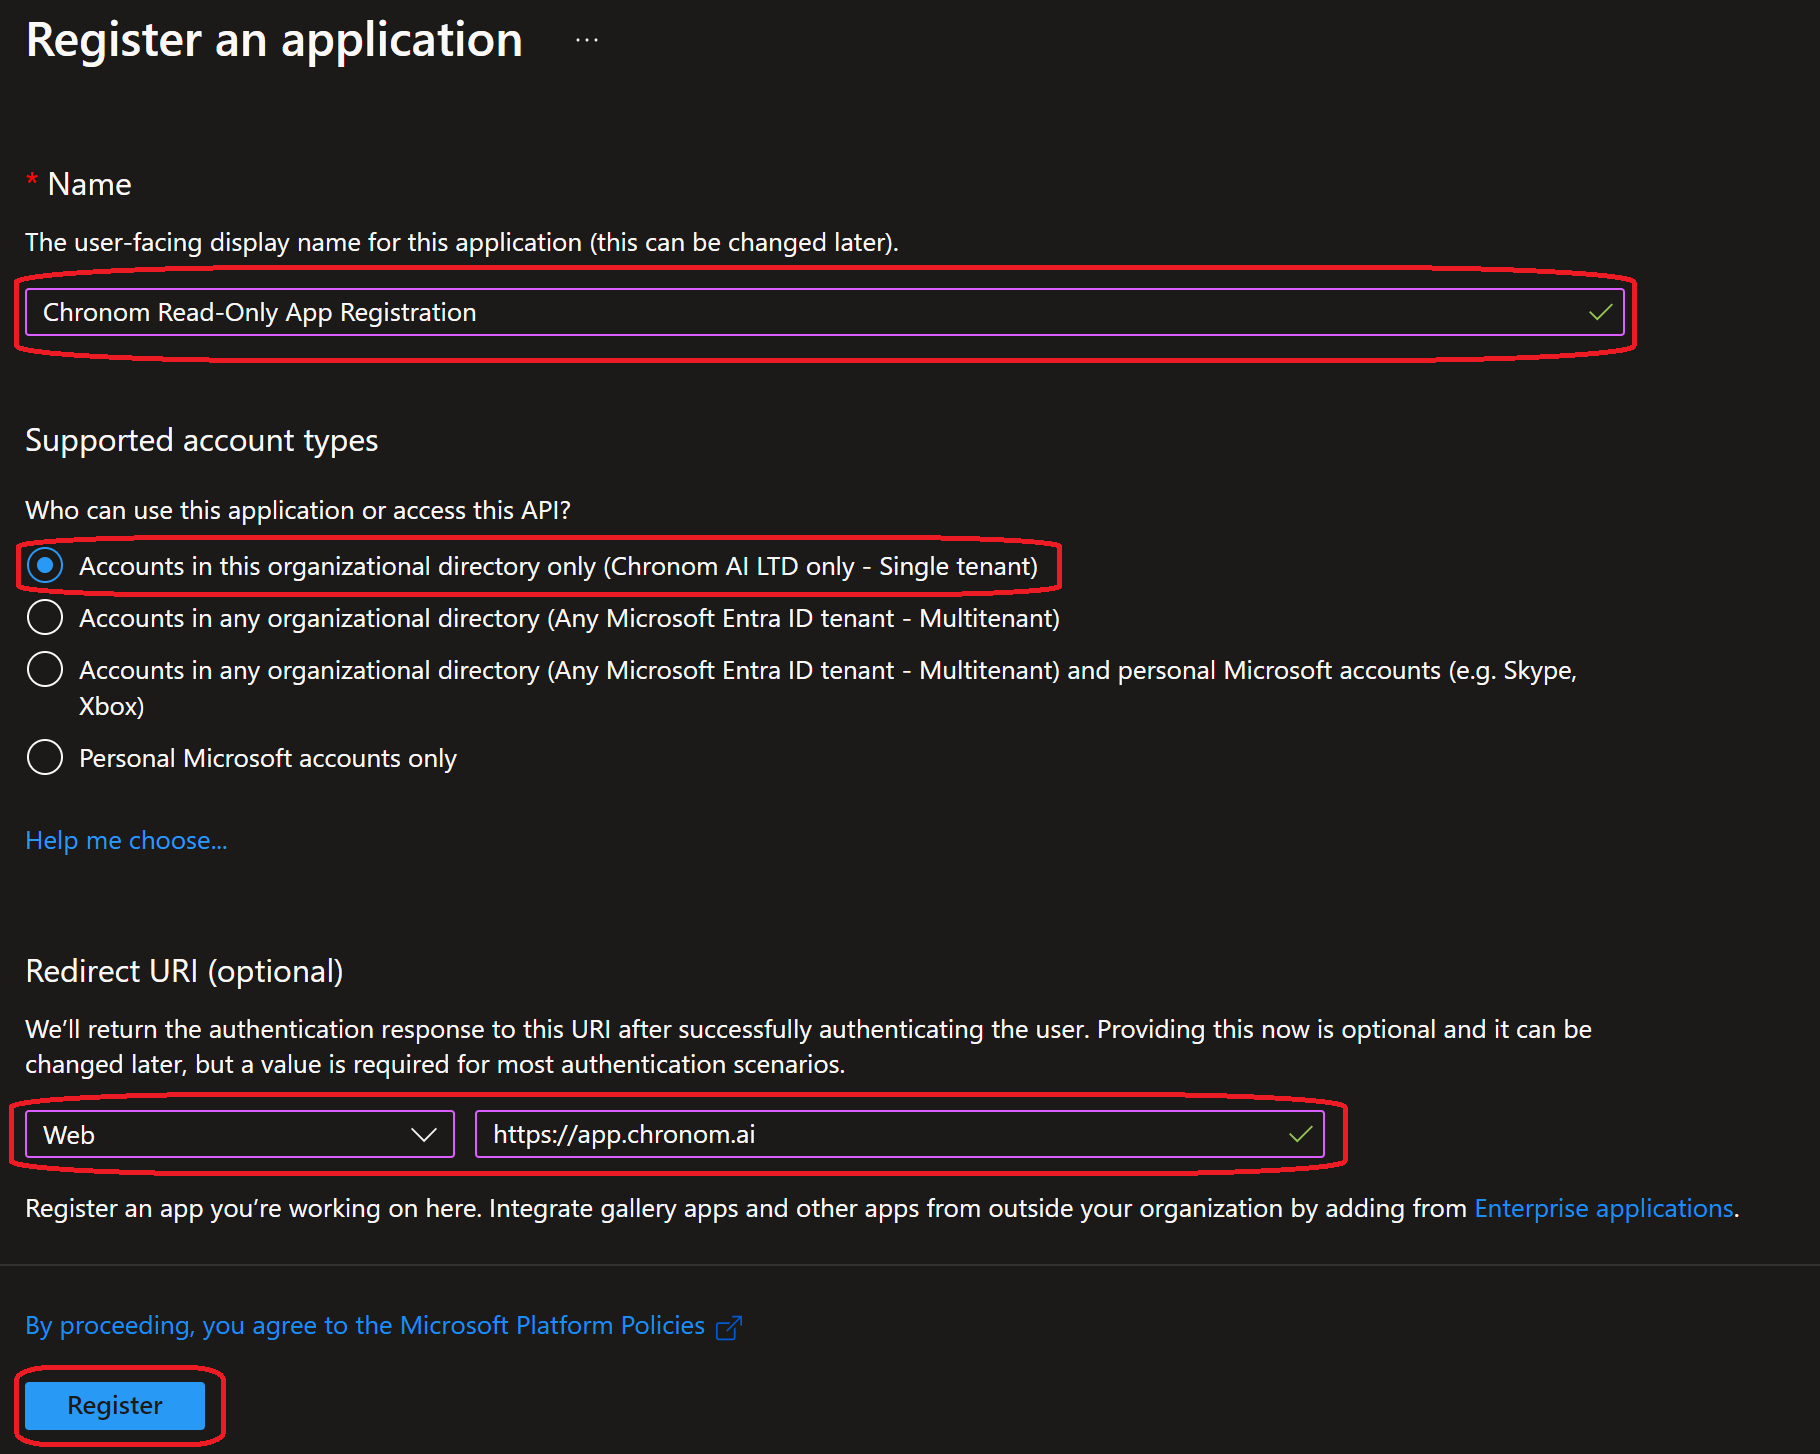
Fill in the following details:
- Name:
Chronom Read-Only App Registration - Supported account types:
Accounts in this organizational directory only (Microsoft only - Single tenant) - Redirect URI:
- Platform:
web - URI:
https://app.chronom.ai
- Platform:
- Click on the
Registerbutton.
- Name:
-
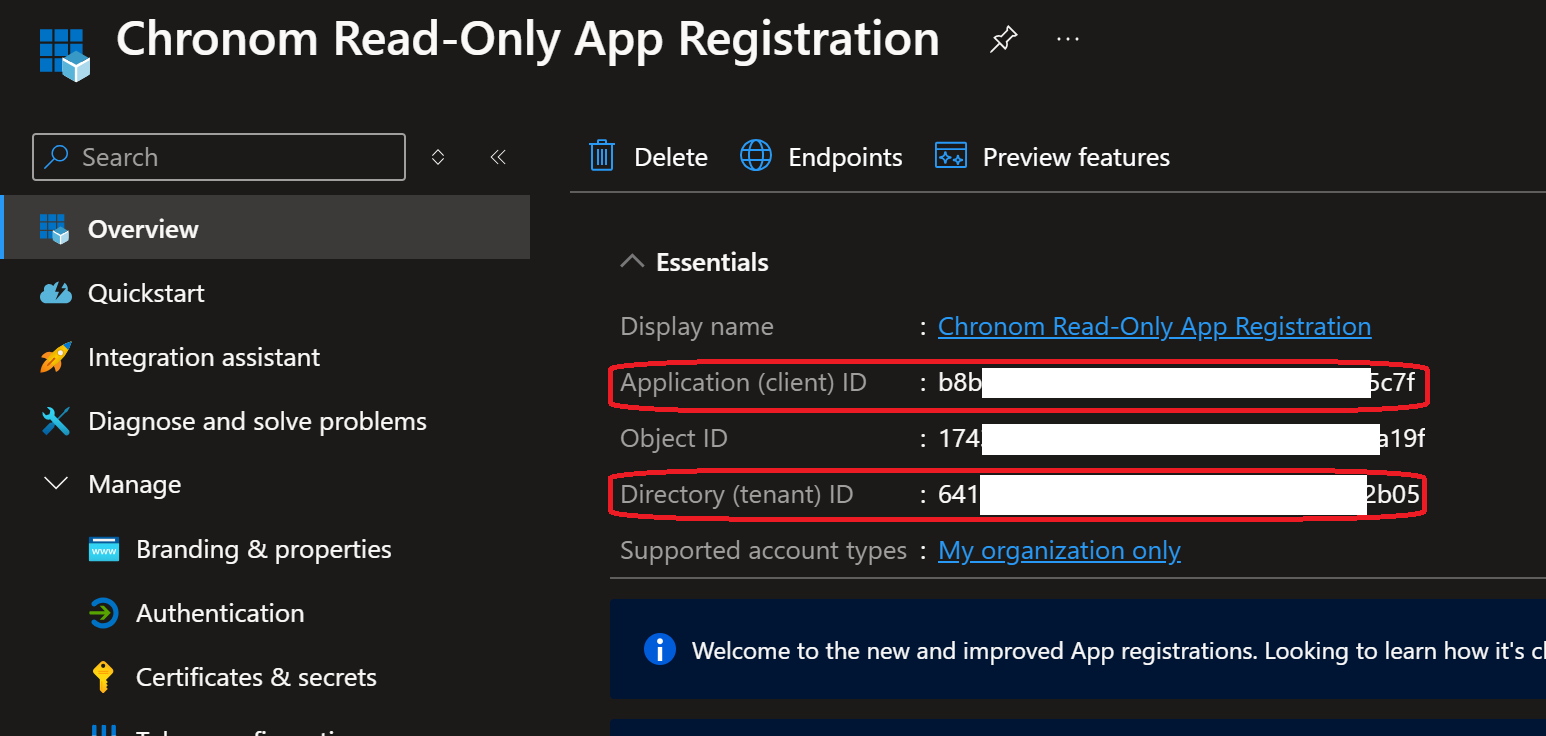
Once the App Registration is created, take note of the following details:
- Application (client) ID
- Directory (tenant) ID
 note
noteAfter the initial creation, an enterprise application is created automatically. To configure API permissions and client secrets, you need to navigate to the App Registration. You can find it by going to
Entra ID→App registrations→Chronom Read-Only App Registration, or by staying on the current page after registration.
All steps below should be executed in the same bash session.
It is recommended to copy and paste the commands one by one to avoid any mistakes.
The steps below assume you have Azure CLI installed and configured with the necessary permissions.
If you haven't installed Azure CLI yet, you can follow the instructions here.
-
If not already installed, install jq by following the instructions here.
-
Authenticate Azure CLI with the Tenant where your subscriptions are by running the following command:
az login -
Create the App Registration by running the following command:
appRegistration=$(az ad app create --display-name "Chronom Read-Only App Registration" \
                            --sign-in-audience "AzureADMyOrg" \
                            --web-redirect-uris "https://app.chronom.ai")
clientId=$(echo $appRegistration | jq -r '.appId')
tenantId=$(az account show --query tenantId -o tsv)
echo "Application (client) ID: $clientId"
echo "Directory (tenant) ID: $tenantId"
All steps below should be executed in the same PowerShell session.
It is recommended to copy and paste the commands one by one to avoid any mistakes.
The steps below assume you have Azure CLI installed and configured with the necessary permissions.
If you haven't installed Azure CLI yet, you can follow the instructions here.
-
Authenticate Azure CLI with the Tenant where your subscriptions are by running the following command:
az login -
Create the App Registration by running the following command:
$appRegistration = az ad app create --display-name "Chronom Read-Only App Registration" `
                               --sign-in-audience "AzureADMyOrg" `
                               --web-redirect-uris "https://app.chronom.ai" | ConvertFrom-Json
$clientId = $appRegistration.appId
$tenantId = (az account show --query tenantId -o tsv).Trim()
Write-Host "Application (client) ID: $clientId"
Write-Host "Directory (tenant) ID: $tenantId"
Step 2: Configure API Permissions
- Azure Portal
- Azure CLI (bash)
- Azure CLI (PowerShell)
-
Navigate to the
API permissionssection under theManageon the left-hand side menu.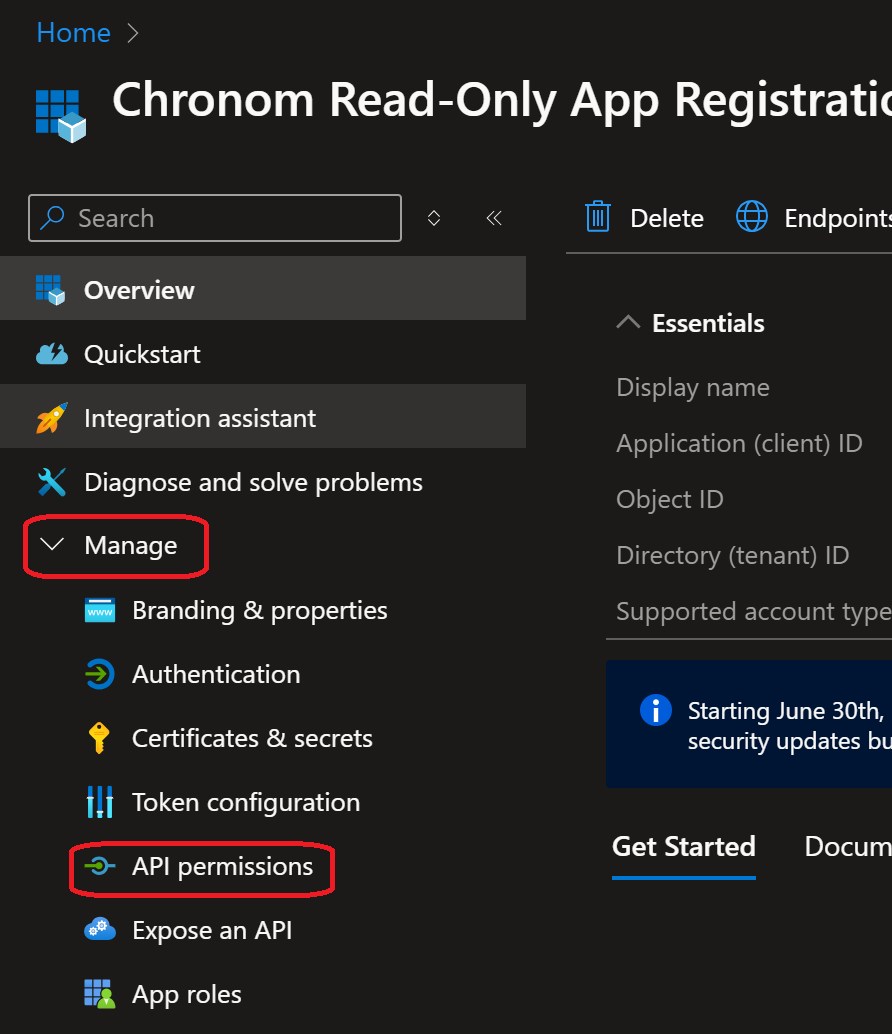
-
Click on the
+ Add a permissionbutton and selectMicrosoft Graphfrom the list of APIs.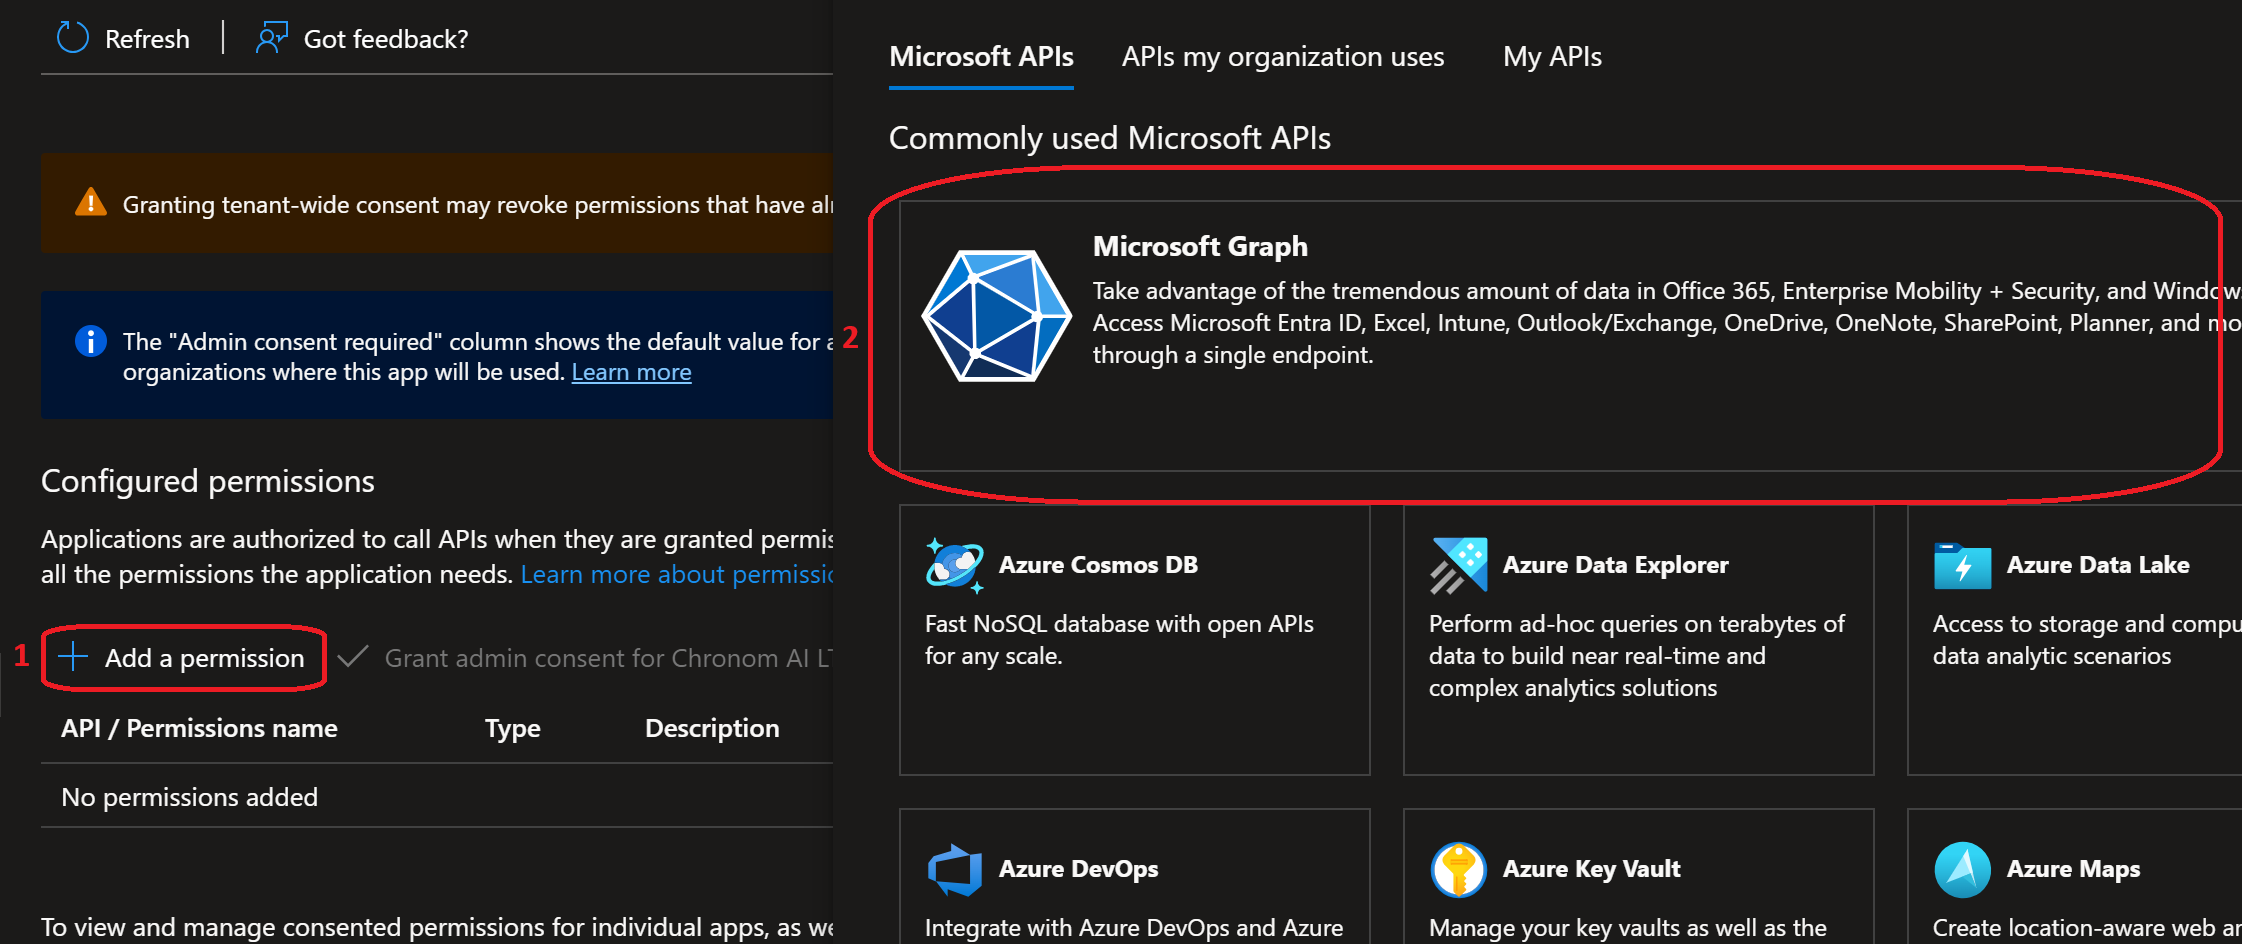
-
First, add the Delegated permission. Select
Delegated permissions, search forUser.Read, select it under theUsercategory, and clickAdd permissions.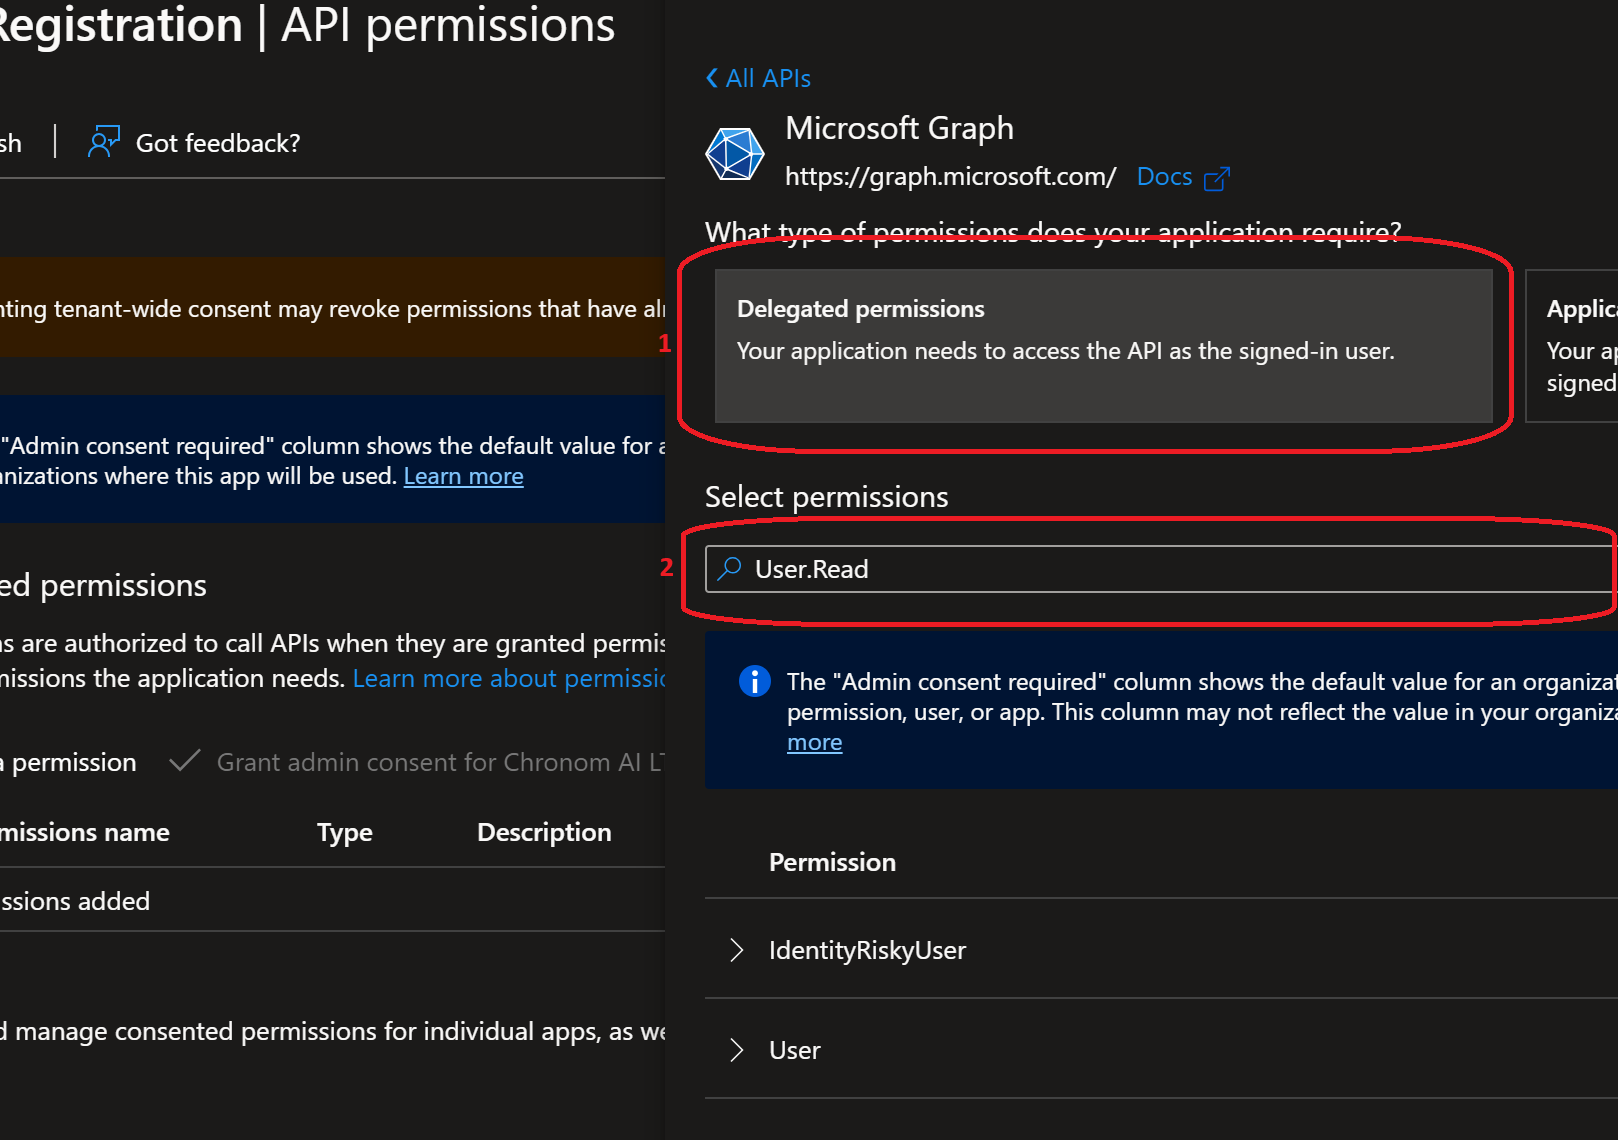
-
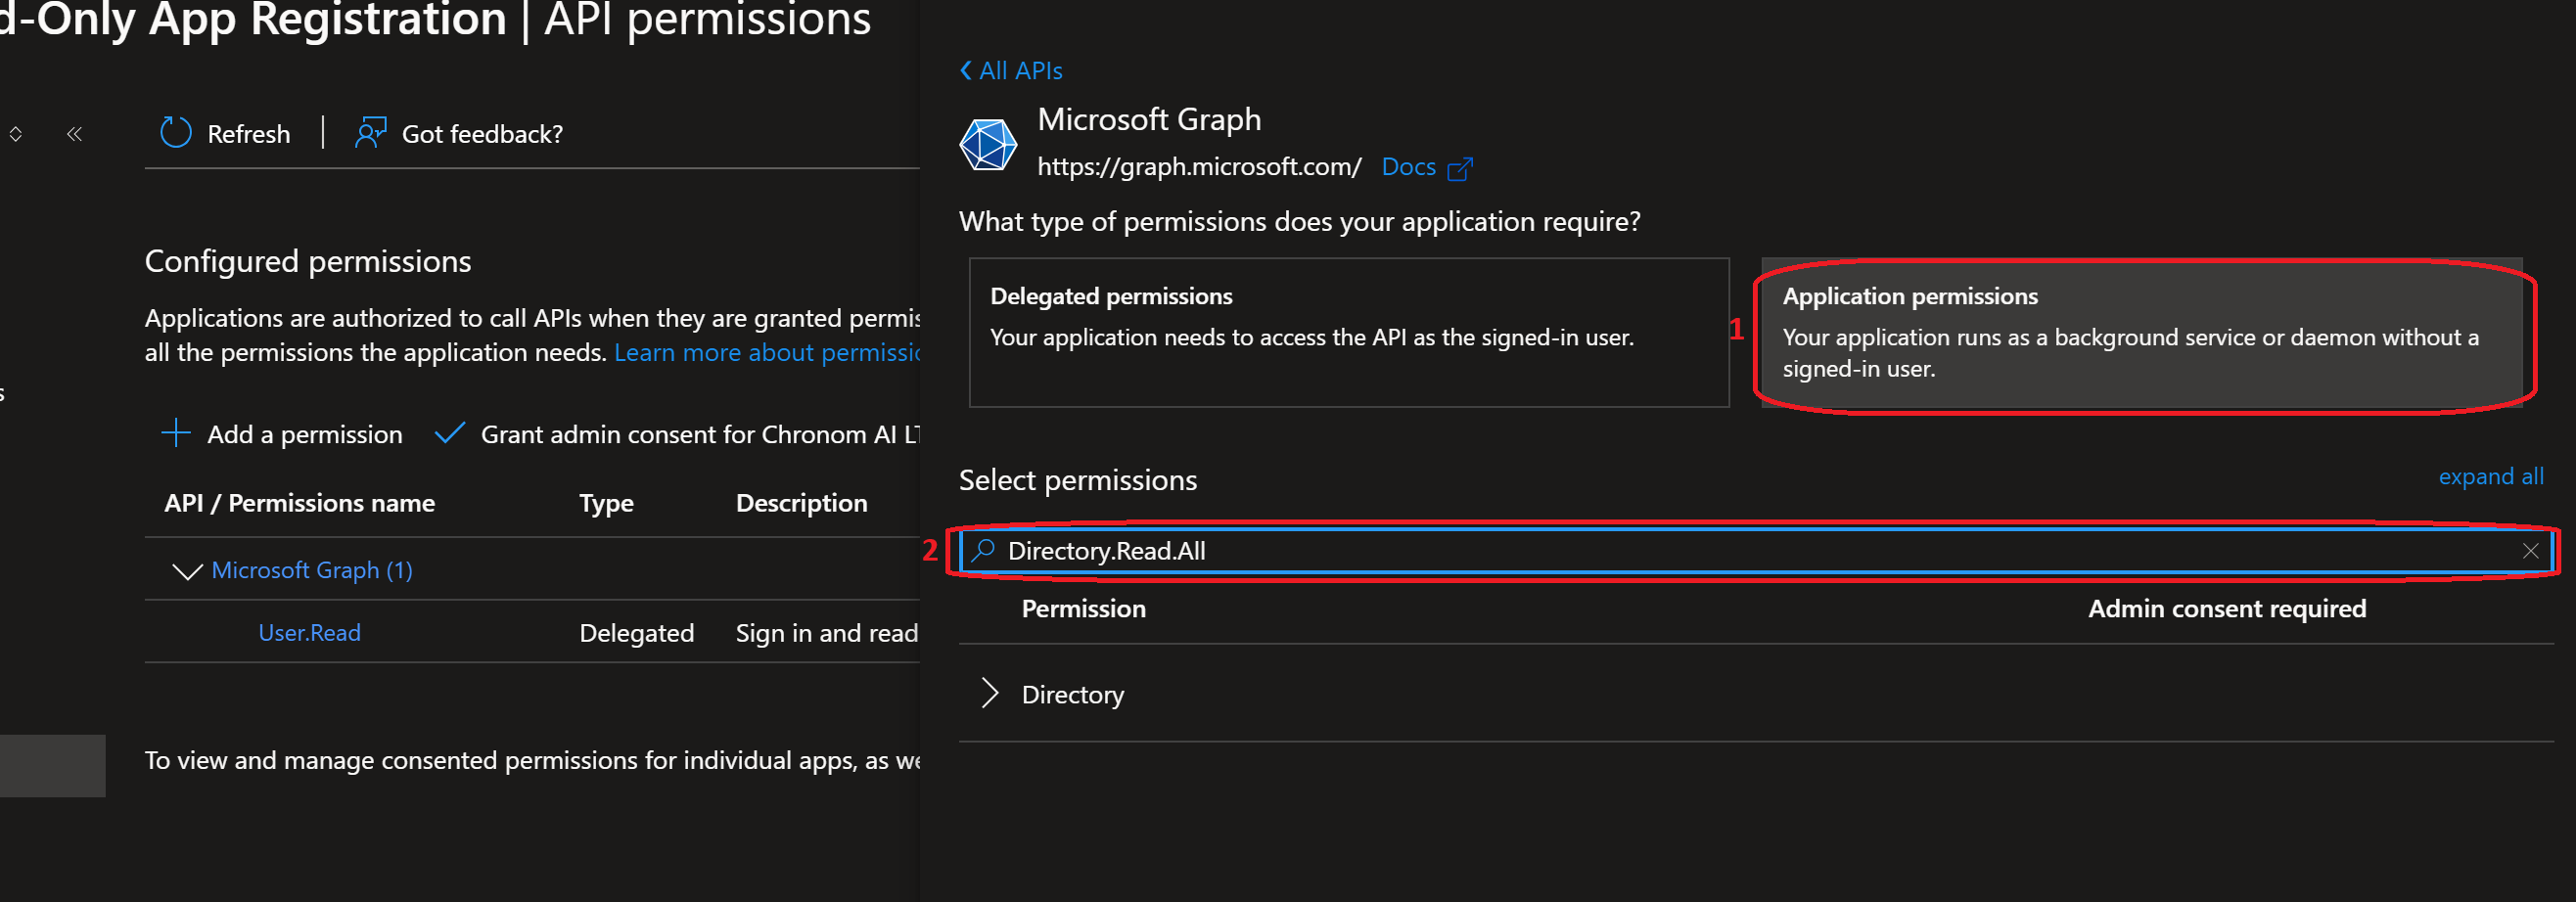
Next, add all Application permissions. For each permission in the list below, repeat these steps:
- Click
+ Add a permission→ selectMicrosoft Graph→ selectApplication permissions - Search for the permission name, select it, and click
Add permissions
Add the following Application permissions:
# Permission Category Purpose 1 Directory.Read.AllDirectory Read directory data for license mapping 2 Agreement.Read.AllPolicy Read organizational agreements 3 AuditLog.Read.AllAuditLogs Read audit log data 4 Reports.Read.AllReports Read usage reports for license optimization 5 Sites.Read.AllSites Read SharePoint site metadata 6 TermStore.Read.AllTermStore Read term store data 7 DeviceManagementApps.Read.AllDeviceManagementApps Read Intune app deployments 8 DeviceManagementConfiguration.Read.AllDeviceManagementConfiguration Read Intune configuration profiles 9 DeviceManagementManagedDevices.Read.AllDeviceManagementManagedDevices Read Intune managed device inventory 10 DeviceManagementServiceConfig.Read.AllDeviceManagementServiceConfig Read Intune service configuration 11 eDiscovery.Read.AlleDiscovery Read eDiscovery cases and holds 12 InformationProtectionPolicy.ReadInformationProtectionPolicy Read sensitivity labels and policies 13 SecurityEvents.Read.AllSecurityEvents Read security alerts from Defender 14 MailboxSettings.ReadMailboxSettings Read mailbox settings for all users tipYou can add multiple permissions in a single pass: after clicking
+ Add a permission→Microsoft Graph→Application permissions, search and check several permissions before clickingAdd permissions. This is faster than adding them one at a time. - Click
-
After adding all permissions, your API permissions list should show 1 Delegated permission and 14 Application permissions - all under Microsoft Graph.
After adding all permissions, you must click the Grant admin consent for <Your Tenant> button at the top of the permissions list, then confirm by clicking Yes.
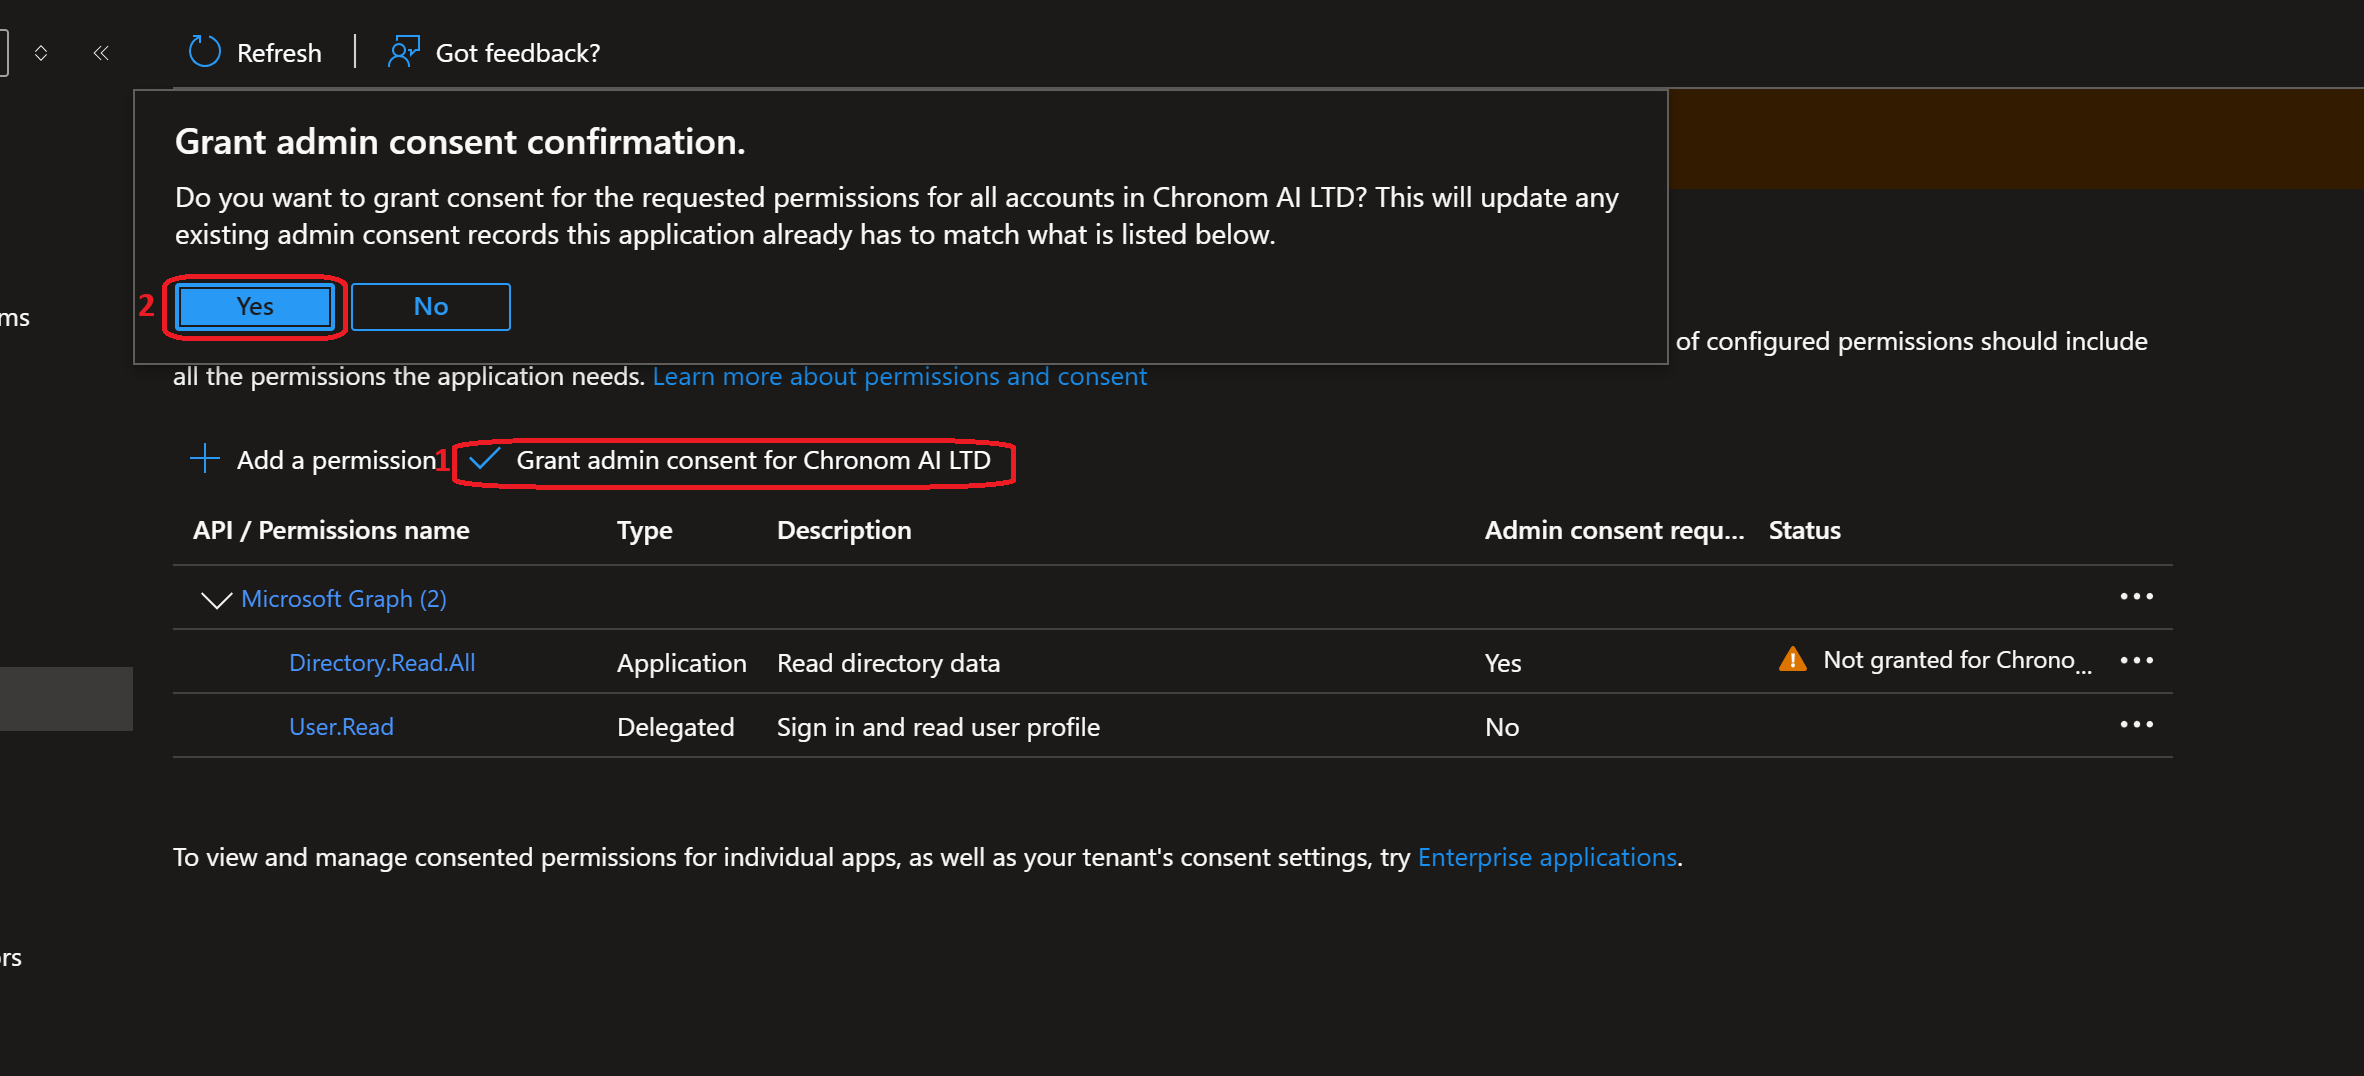
Without this step, none of the permissions will take effect. The Status column for each permission must show a green checkmark with "Granted for <Your Tenant>" - not a yellow warning icon. If you see warning icons, admin consent has not been granted.
This is the most commonly missed step during onboarding. Please verify the status of every permission before proceeding.
-
Grant
User.ReadAPI Permissions to the App Registration by running the following command:az ad app permission add --id "$clientId" \
--api 00000003-0000-0000-c000-000000000000 \
--api-permissions e1fe6dd8-ba31-4d61-89e7-88639da4683d=Scope
az ad sp create --id $clientId
az ad app permission grant --id $clientId --api 00000003-0000-0000-c000-000000000000 --scope "User.Read" -
Grant
Directory.Read.AllAPI Permissions to the App Registration with Admin Consent by running the following command:az ad app permission add --id "$clientId" \
--api 00000003-0000-0000-c000-000000000000 \
--api-permissions 7ab1d382-f21e-4acd-a863-ba3e13f7da61=Role
az ad app permission admin-consent --id $clientId -
Grant
Agreement.Read.AllAPI Permissions to the App Registration with Admin Consent by running the following command:az ad app permission add --id "$clientId" \
--api 00000003-0000-0000-c000-000000000000 \
--api-permissions 2f3e6f8c-093b-4c57-a58b-ba5ce494a169=Role
az ad app permission admin-consent --id $clientId -
Grant
AuditLog.Read.AllAPI Permissions to the App Registration with Admin Consent by running the following command:az ad app permission add --id "$clientId" \
--api 00000003-0000-0000-c000-000000000000 \
--api-permissions b0afded3-3588-46d8-8b3d-9842eff778da=Role
az ad app permission admin-consent --id $clientId -
Grant
Reports.Read.AllAPI Permissions to the App Registration with Admin Consent by running the following command:az ad app permission add --id "$clientId" \
--api 00000003-0000-0000-c000-000000000000 \
--api-permissions 230c1aed-a721-4c5d-9cb4-a90514e508ef=Role
az ad app permission admin-consent --id $clientId -
Grant
Sites.Read.AllAPI Permissions to the App Registration with Admin Consent by running the following command:az ad app permission add --id "$clientId" \
--api 00000003-0000-0000-c000-000000000000 \
--api-permissions 332a536c-c7ef-4017-ab91-336970924f0d=Role
az ad app permission admin-consent --id $clientId -
Grant
TermStore.Read.AllAPI Permissions to the App Registration with Admin Consent by running the following command:az ad app permission add --id "$clientId" \
--api 00000003-0000-0000-c000-000000000000 \
--api-permissions ea047cc2-df29-4f3e-83a3-205de61f1791=Role
az ad app permission admin-consent --id $clientId -
Grant
DeviceManagementApps.Read.AllAPI Permissions to the App Registration with Admin Consent by running the following command:az ad app permission add --id "$clientId" \
--api 00000003-0000-0000-c000-000000000000 \
--api-permissions 7a6ee1e7-141e-4cec-ae74-d9db155731ff=Role
az ad app permission admin-consent --id $clientId -
Grant
DeviceManagementConfiguration.Read.AllAPI Permissions to the App Registration with Admin Consent by running the following command:az ad app permission add --id "$clientId" \
--api 00000003-0000-0000-c000-000000000000 \
--api-permissions dc377aa6-52d8-4e23-b271-2a7ae04cedf3=Role
az ad app permission admin-consent --id $clientId -
Grant
DeviceManagementManagedDevices.Read.AllAPI Permissions to the App Registration with Admin Consent by running the following command:az ad app permission add --id "$clientId" \
--api 00000003-0000-0000-c000-000000000000 \
--api-permissions 2f51be20-0bb4-4fed-bf7b-db946066c75e=Role
az ad app permission admin-consent --id $clientId -
Grant
DeviceManagementServiceConfig.Read.AllAPI Permissions to the App Registration with Admin Consent by running the following command:az ad app permission add --id "$clientId" \
--api 00000003-0000-0000-c000-000000000000 \
--api-permissions 06a5fe6d-c49d-46a7-b082-56b1b14103c7=Role
az ad app permission admin-consent --id $clientId -
Grant
eDiscovery.Read.AllAPI Permissions to the App Registration with Admin Consent by running the following command:az ad app permission add --id "$clientId" \
--api 00000003-0000-0000-c000-000000000000 \
--api-permissions 50180013-6191-4d1e-a373-e590ff4e66af=Role
az ad app permission admin-consent --id $clientId -
Grant
InformationProtectionPolicy.ReadAPI Permissions to the App Registration with Admin Consent by running the following command:az ad app permission add --id "$clientId" \
--api 00000003-0000-0000-c000-000000000000 \
--api-permissions 4ad84827-5578-4e18-ad7a-86530b12f884=Role
az ad app permission admin-consent --id $clientId -
Grant
SecurityEvents.Read.AllAPI Permissions to the App Registration with Admin Consent by running the following command:az ad app permission add --id "$clientId" \
--api 00000003-0000-0000-c000-000000000000 \
--api-permissions bf394140-e372-4bf9-a898-299cfc7564e5=Role
az ad app permission admin-consent --id $clientId -
Grant
MailboxSettings.ReadAPI Permissions to the App Registration with Admin Consent by running the following command:az ad app permission add --id "$clientId" \
--api 00000003-0000-0000-c000-000000000000 \
--api-permissions 40f97065-369a-49f4-947c-6a255697ae91=Role
az ad app permission admin-consent --id $clientId
-
Grant
User.ReadAPI Permissions to the App Registration by running the following command:az ad app permission add --id $clientId `
--api 00000003-0000-0000-c000-000000000000 `
--api-permissions e1fe6dd8-ba31-4d61-89e7-88639da4683d=Scope
az ad sp create --id $clientId
az ad app permission grant --id $clientId --api 00000003-0000-0000-c000-000000000000 --scope "User.Read" -
Grant
Directory.Read.AllAPI Permissions to the App Registration with Admin Consent by running the following command:az ad app permission add --id $clientId `
--api 00000003-0000-0000-c000-000000000000 `
--api-permissions 7ab1d382-f21e-4acd-a863-ba3e13f7da61=Role
az ad app permission admin-consent --id $clientId -
Grant
Agreement.Read.AllAPI Permissions to the App Registration with Admin Consent by running the following command:az ad app permission add --id $clientId `
--api 00000003-0000-0000-c000-000000000000 `
--api-permissions 2f3e6f8c-093b-4c57-a58b-ba5ce494a169=Role
az ad app permission admin-consent --id $clientId -
Grant
AuditLog.Read.AllAPI Permissions to the App Registration with Admin Consent by running the following command:az ad app permission add --id $clientId `
--api 00000003-0000-0000-c000-000000000000 `
--api-permissions b0afded3-3588-46d8-8b3d-9842eff778da=Role
az ad app permission admin-consent --id $clientId -
Grant
Reports.Read.AllAPI Permissions to the App Registration with Admin Consent by running the following command:az ad app permission add --id $clientId `
--api 00000003-0000-0000-c000-000000000000 `
--api-permissions 230c1aed-a721-4c5d-9cb4-a90514e508ef=Role
az ad app permission admin-consent --id $clientId -
Grant
Sites.Read.AllAPI Permissions to the App Registration with Admin Consent by running the following command:az ad app permission add --id $clientId `
--api 00000003-0000-0000-c000-000000000000 `
--api-permissions 332a536c-c7ef-4017-ab91-336970924f0d=Role
az ad app permission admin-consent --id $clientId -
Grant
TermStore.Read.AllAPI Permissions to the App Registration with Admin Consent by running the following command:az ad app permission add --id $clientId `
--api 00000003-0000-0000-c000-000000000000 `
--api-permissions ea047cc2-df29-4f3e-83a3-205de61f1791=Role
az ad app permission admin-consent --id $clientId -
Grant
DeviceManagementApps.Read.AllAPI Permissions to the App Registration with Admin Consent by running the following command:az ad app permission add --id $clientId `
--api 00000003-0000-0000-c000-000000000000 `
--api-permissions 7a6ee1e7-141e-4cec-ae74-d9db155731ff=Role
az ad app permission admin-consent --id $clientId -
Grant
DeviceManagementConfiguration.Read.AllAPI Permissions to the App Registration with Admin Consent by running the following command:az ad app permission add --id $clientId `
--api 00000003-0000-0000-c000-000000000000 `
--api-permissions dc377aa6-52d8-4e23-b271-2a7ae04cedf3=Role
az ad app permission admin-consent --id $clientId -
Grant
DeviceManagementManagedDevices.Read.AllAPI Permissions to the App Registration with Admin Consent by running the following command:az ad app permission add --id $clientId `
--api 00000003-0000-0000-c000-000000000000 `
--api-permissions 2f51be20-0bb4-4fed-bf7b-db946066c75e=Role
az ad app permission admin-consent --id $clientId -
Grant
DeviceManagementServiceConfig.Read.AllAPI Permissions to the App Registration with Admin Consent by running the following command:az ad app permission add --id $clientId `
--api 00000003-0000-0000-c000-000000000000 `
--api-permissions 06a5fe6d-c49d-46a7-b082-56b1b14103c7=Role
az ad app permission admin-consent --id $clientId -
Grant
eDiscovery.Read.AllAPI Permissions to the App Registration with Admin Consent by running the following command:az ad app permission add --id $clientId `
--api 00000003-0000-0000-c000-000000000000 `
--api-permissions 50180013-6191-4d1e-a373-e590ff4e66af=Role
az ad app permission admin-consent --id $clientId -
Grant
InformationProtectionPolicy.ReadAPI Permissions to the App Registration with Admin Consent by running the following command:az ad app permission add --id $clientId `
--api 00000003-0000-0000-c000-000000000000 `
--api-permissions 4ad84827-5578-4e18-ad7a-86530b12f884=Role
az ad app permission admin-consent --id $clientId -
Grant
SecurityEvents.Read.AllAPI Permissions to the App Registration with Admin Consent by running the following command:az ad app permission add --id $clientId `
--api 00000003-0000-0000-c000-000000000000 `
--api-permissions bf394140-e372-4bf9-a898-299cfc7564e5=Role
az ad app permission admin-consent --id $clientId -
Grant
MailboxSettings.ReadAPI Permissions to the App Registration with Admin Consent by running the following command:az ad app permission add --id $clientId `
--api 00000003-0000-0000-c000-000000000000 `
--api-permissions 40f97065-369a-49f4-947c-6a255697ae91=Role
az ad app permission admin-consent --id $clientId
Step 3: Generate Client Secret
- Azure Portal
- Azure CLI (bash)
- Azure CLI (PowerShell)
-
Navigate to the
Certificates & secretssection under theManageon the left-hand side menu.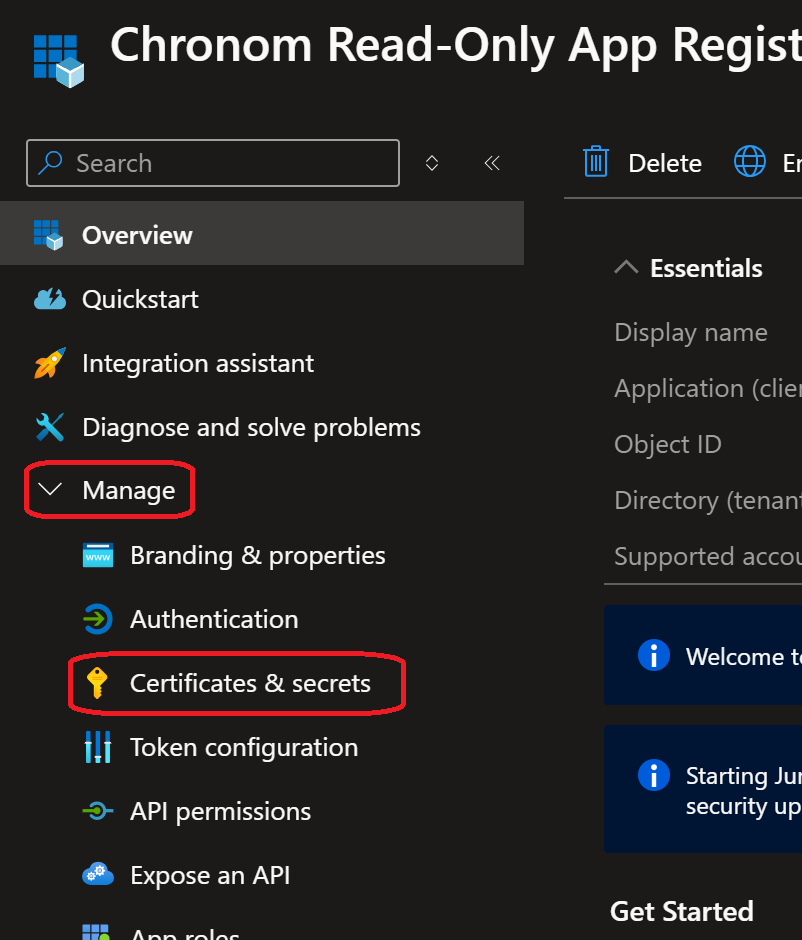
-
Click on the
+ New client secretbutton under theClient secretstab and fill in the following details:- Description:
Chronom Read-Only Secret - Expires:
730 days (24 months) - Click on the
Addbutton.
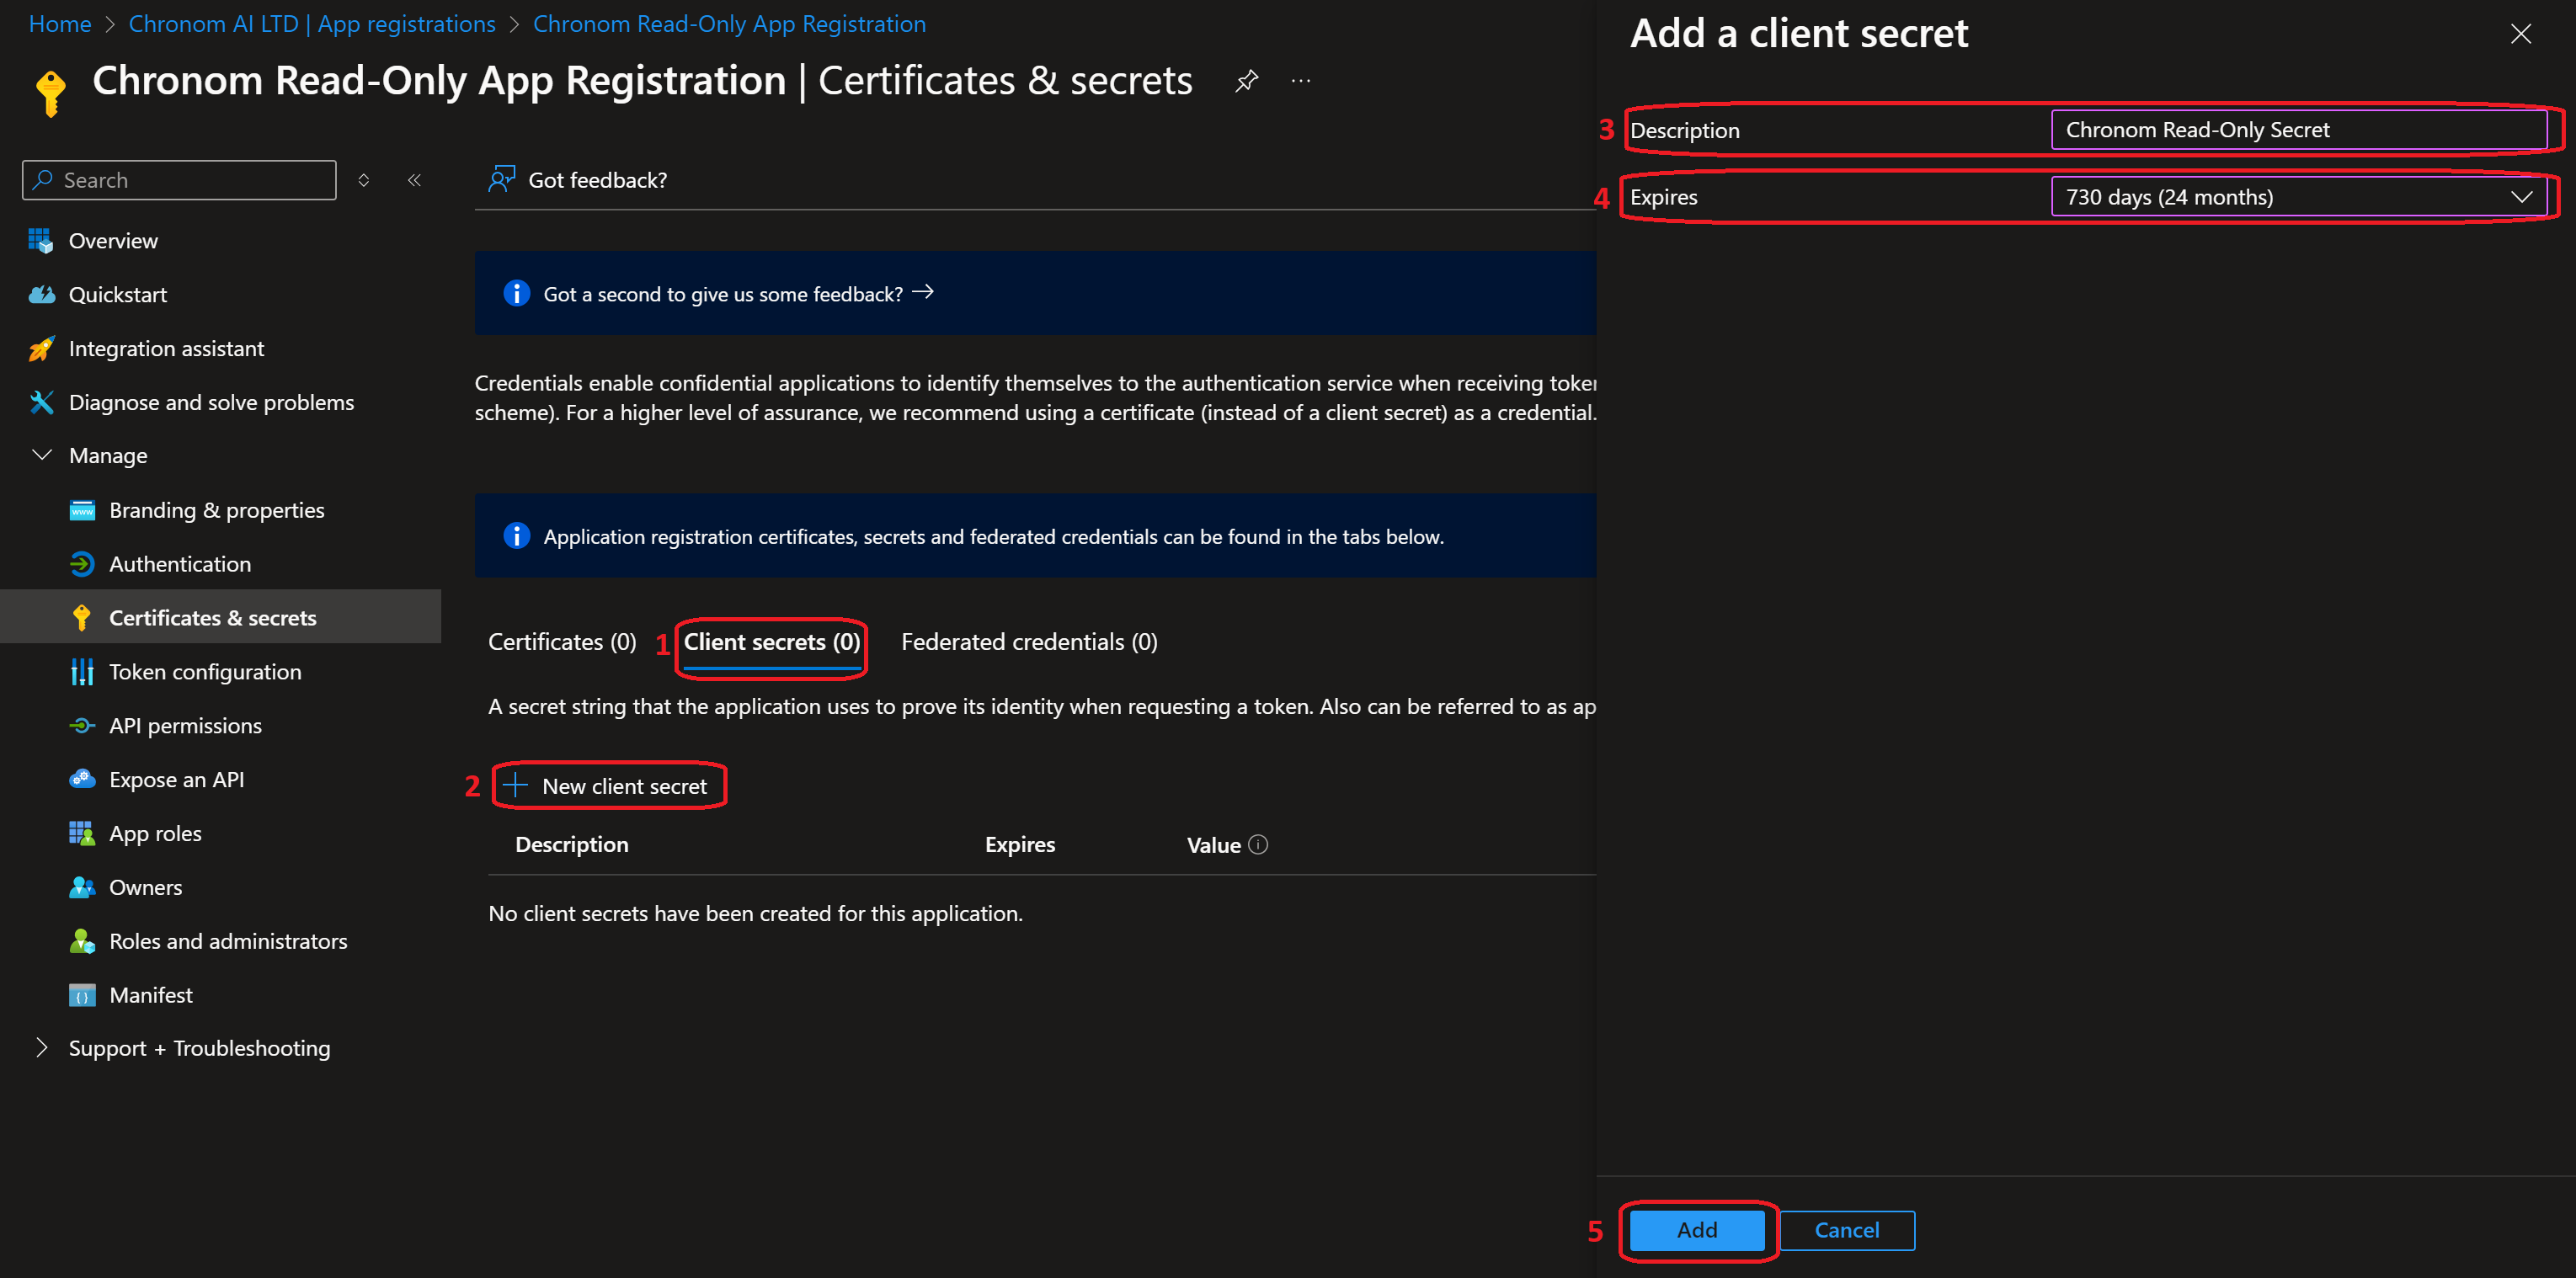
- Description:
-
Once the secret is created, take note of the
Valueas it will be used to authenticate the App Registration in Chronom.dangerHandle with Extreme Care!
Client Secret is considered a highly sensitive credential.
Make sure to store it in a secure location and only share it via Chronom's Integrations Page.
Chronom will never ask you for your Client Secret via email or any other communication channel.
Do not share your Client Secret with anyone else.noteThe Client Secret is only displayed once after creation.

-
Create a new client secret by running the following command:
dangerHandle with Extreme Care!
Client Secret is considered a highly sensitive credential.
Make sure to store it in a secure location and only share it via Chronom's Integrations Page.
Chronom will never ask you for your Client Secret via email or any other communication channel.
Do not share your Client Secret with anyone else.clientSecret=$(az ad app credential reset --id "$clientId" \
--display-name "Chronom Read-Only Secret" \
--years 2)
clientSecretValue=$(echo $clientSecret | jq -r '.password')
echo "Client Secret Value: $clientSecretValue"
-
Create a new client secret by running the following command:
dangerHandle with Extreme Care!
Client Secret is considered a highly sensitive credential.
Make sure to store it in a secure location and only share it via Chronom's Integrations Page.
Chronom will never ask you for your Client Secret via email or any other communication channel.
Do not share your Client Secret with anyone else.$clientSecret = az ad app credential reset --id $clientId `
--display-name "Chronom Read-Only Secret" `
--years 2 | ConvertFrom-Json
$clientSecretValue = $clientSecret.password
Write-Host "Client Secret Value: $clientSecretValue"
Step 4: Connect to Chronom
- Azure Portal
- Azure CLI (bash)
- Azure CLI (PowerShell)
-
On a new tab, navigate to Chronom's Integrations Page and click on the
+ Add a new Tenantbutton.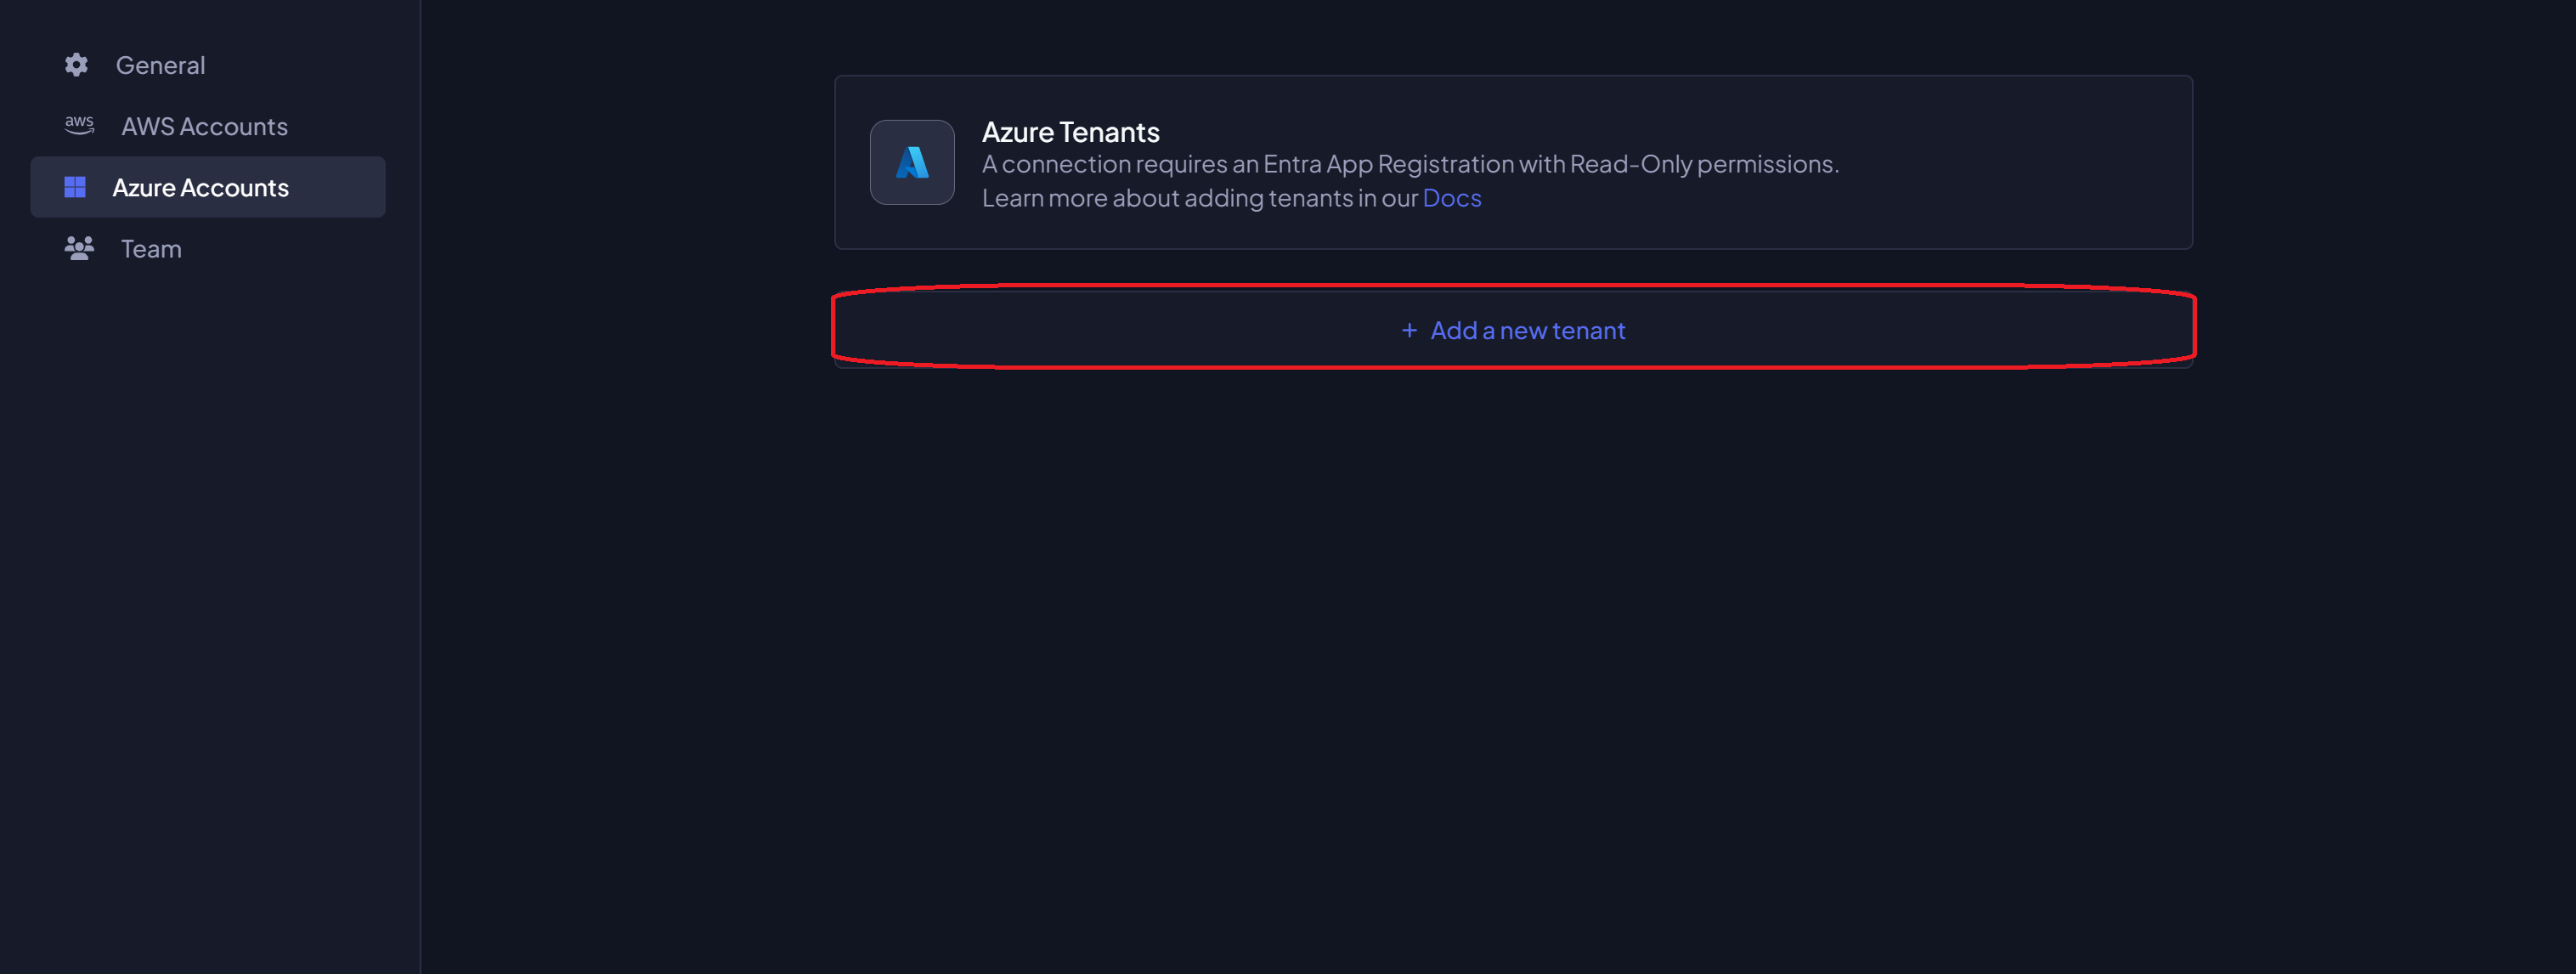
-
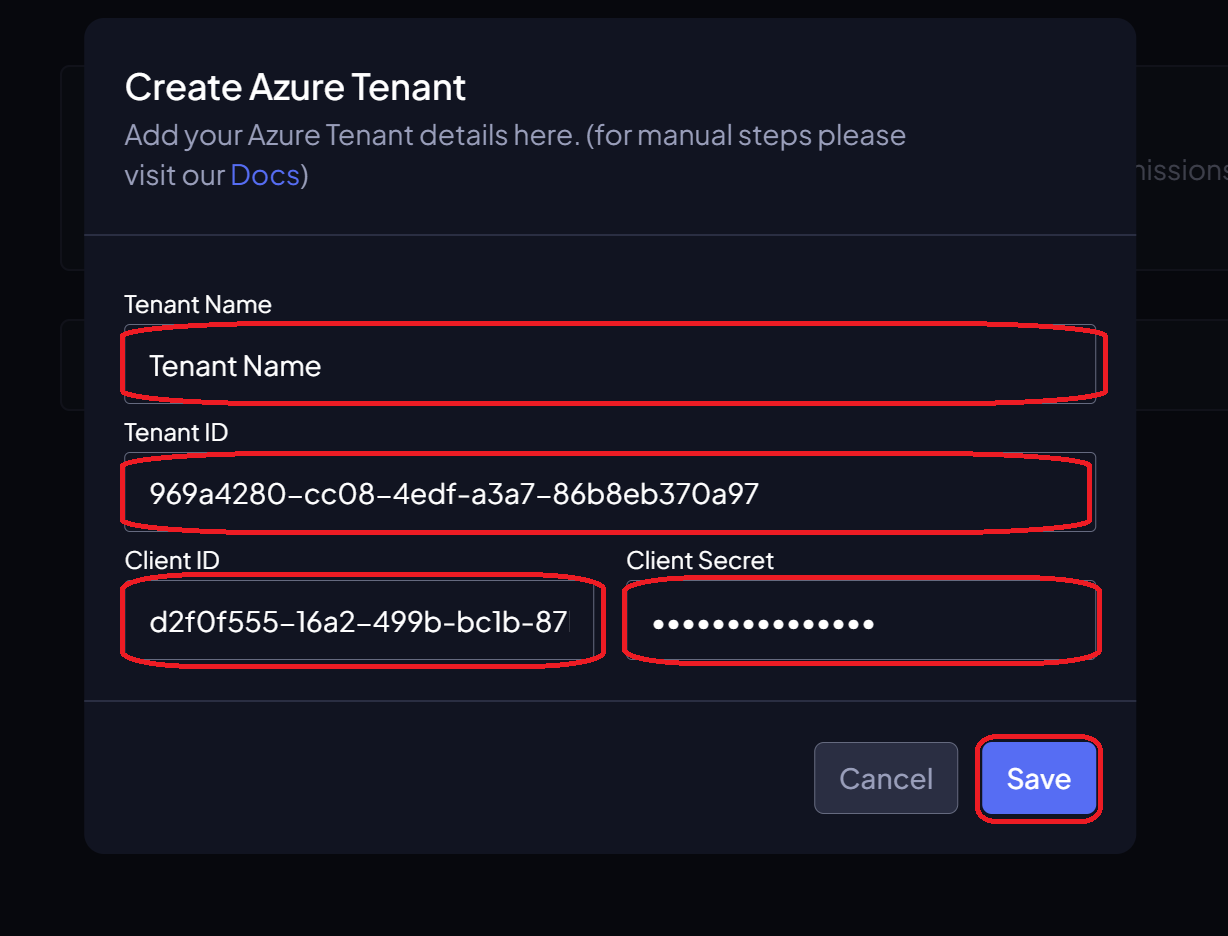
Fill in the details and click on the
Savebutton:- Tenant Name: The name of the Azure Tenant where the App Registration was created.
- Tenant ID: The Directory (tenant) ID of the App Registration.
- Application ID: The Application (client) ID of the App Registration.
- Client Secret: The Value of the Client Secret created in the previous step.
-
Navigate to Chronom's Integrations Page and click on the
+ Add a new Tenantbutton. -
Fill in the details and click on the
Savebutton:- Tenant Name: The name of the Azure Tenant where the App Registration was created.
- Tenant ID: The Directory (tenant) ID of the App Registration (printed in Step 1).
- Application ID: The Application (client) ID of the App Registration (printed in Step 1).
- Client Secret: The Value of the Client Secret created in the previous step.
Complete Scripts
For convenience, here are the complete scripts that combine all steps above.
- Azure Portal
- Azure CLI (bash)
- Azure CLI (PowerShell)
The Azure Portal method does not have a combined script. Please follow the step-by-step instructions above.
#!/bin/bash
# Authenticate Azure CLI
az login
# Create the App Registration
appRegistration=$(az ad app create --display-name "Chronom Read-Only App Registration" \
--sign-in-audience "AzureADMyOrg" \
--web-redirect-uris "https://app.chronom.ai")
clientId=$(echo $appRegistration | jq -r '.appId')
tenantId=$(az account show --query tenantId -o tsv)
# Grant User.Read API Permissions
az ad app permission add --id "$clientId" \
                         --api 00000003-0000-0000-c000-000000000000 \
                         --api-permissions e1fe6dd8-ba31-4d61-89e7-88639da4683d=Scope
az ad sp create --id $clientId
az ad app permission grant --id $clientId --api 00000003-0000-0000-c000-000000000000 --scope "User.Read"
# Grant Directory.Read.All API Permissions
az ad app permission add --id "$clientId" \
                          --api 00000003-0000-0000-c000-000000000000 \
                          --api-permissions 7ab1d382-f21e-4acd-a863-ba3e13f7da61=Role
az ad app permission admin-consent --id $clientId
# Grant Agreement.Read.All API Permissions
az ad app permission add --id "$clientId" \
                          --api 00000003-0000-0000-c000-000000000000 \
                          --api-permissions 2f3e6f8c-093b-4c57-a58b-ba5ce494a169=Role
az ad app permission admin-consent --id $clientId
# Grant AuditLog.Read.All API Permissions
az ad app permission add --id "$clientId" \
                          --api 00000003-0000-0000-c000-000000000000 \
                          --api-permissions b0afded3-3588-46d8-8b3d-9842eff778da=Role
az ad app permission admin-consent --id $clientId
# Grant Reports.Read.All API Permissions
az ad app permission add --id "$clientId" \
                          --api 00000003-0000-0000-c000-000000000000 \
                          --api-permissions 230c1aed-a721-4c5d-9cb4-a90514e508ef=Role
az ad app permission admin-consent --id $clientId
# Grant Sites.Read.All API Permissions
az ad app permission add --id "$clientId" \
                          --api 00000003-0000-0000-c000-000000000000 \
                          --api-permissions 332a536c-c7ef-4017-ab91-336970924f0d=Role
az ad app permission admin-consent --id $clientId
# Grant TermStore.Read.All API Permissions
az ad app permission add --id "$clientId" \
                          --api 00000003-0000-0000-c000-000000000000 \
                          --api-permissions ea047cc2-df29-4f3e-83a3-205de61f1791=Role
az ad app permission admin-consent --id $clientId
# Grant DeviceManagementApps.Read.All API Permissions
az ad app permission add --id "$clientId" \
                          --api 00000003-0000-0000-c000-000000000000 \
                          --api-permissions 7a6ee1e7-141e-4cec-ae74-d9db155731ff=Role
az ad app permission admin-consent --id $clientId
# Grant DeviceManagementConfiguration.Read.All API Permissions
az ad app permission add --id "$clientId" \
                          --api 00000003-0000-0000-c000-000000000000 \
                          --api-permissions dc377aa6-52d8-4e23-b271-2a7ae04cedf3=Role
az ad app permission admin-consent --id $clientId
# Grant DeviceManagementManagedDevices.Read.All API Permissions
az ad app permission add --id "$clientId" \
                          --api 00000003-0000-0000-c000-000000000000 \
                          --api-permissions 2f51be20-0bb4-4fed-bf7b-db946066c75e=Role
az ad app permission admin-consent --id $clientId
# Grant DeviceManagementServiceConfig.Read.All API Permissions
az ad app permission add --id "$clientId" \
                          --api 00000003-0000-0000-c000-000000000000 \
                          --api-permissions 06a5fe6d-c49d-46a7-b082-56b1b14103c7=Role
az ad app permission admin-consent --id $clientId
# Grant eDiscovery.Read.All API Permissions
az ad app permission add --id "$clientId" \
                          --api 00000003-0000-0000-c000-000000000000 \
                          --api-permissions 50180013-6191-4d1e-a373-e590ff4e66af=Role
az ad app permission admin-consent --id $clientId
# Grant InformationProtectionPolicy.Read API Permissions
az ad app permission add --id "$clientId" \
                          --api 00000003-0000-0000-c000-000000000000 \
                          --api-permissions 4ad84827-5578-4e18-ad7a-86530b12f884=Role
az ad app permission admin-consent --id $clientId
# Grant SecurityEvents.Read.All API Permissions
az ad app permission add --id "$clientId" \
                          --api 00000003-0000-0000-c000-000000000000 \
                          --api-permissions bf394140-e372-4bf9-a898-299cfc7564e5=Role
az ad app permission admin-consent --id $clientId
# Grant MailboxSettings.Read API Permissions
az ad app permission add --id "$clientId" \
                          --api 00000003-0000-0000-c000-000000000000 \
                          --api-permissions 40f97065-369a-49f4-947c-6a255697ae91=Role
az ad app permission admin-consent --id $clientId
# Create a new client secret
clientSecret=$(az ad app credential reset --id "$clientId" \
--display-name "Chronom Read-Only Secret" \
--years 2)
clientSecretValue=$(echo $clientSecret | jq -r '.password')
# Output the App Registration details
echo
echo "Application (client) ID: $clientId"
echo "Directory (tenant) ID: $tenantId"
echo "Client Secret Value: $clientSecretValue"
# Authenticate Azure CLI
az login
# Create the App Registration
$appRegistration = az ad app create --display-name "Chronom Read-Only App Registration" `
--sign-in-audience "AzureADMyOrg" `
--web-redirect-uris "https://app.chronom.ai" | ConvertFrom-Json
$clientId = $appRegistration.appId
$tenantId = (az account show --query tenantId -o tsv).Trim()
# Grant User.Read API Permissions
az ad app permission add --id $clientId `
                         --api 00000003-0000-0000-c000-000000000000 `
                         --api-permissions e1fe6dd8-ba31-4d61-89e7-88639da4683d=Scope
az ad sp create --id $clientId
az ad app permission grant --id $clientId --api 00000003-0000-0000-c000-000000000000 --scope "User.Read"
# Grant Directory.Read.All API Permissions
az ad app permission add --id $clientId `
                         --api 00000003-0000-0000-c000-000000000000 `
                         --api-permissions 7ab1d382-f21e-4acd-a863-ba3e13f7da61=Role
az ad app permission admin-consent --id $clientId
# Grant Agreement.Read.All API Permissions
az ad app permission add --id $clientId `
                          --api 00000003-0000-0000-c000-000000000000 `
                          --api-permissions 2f3e6f8c-093b-4c57-a58b-ba5ce494a169=Role
az ad app permission admin-consent --id $clientId
# Grant AuditLog.Read.All API Permissions
az ad app permission add --id $clientId `
                          --api 00000003-0000-0000-c000-000000000000 `
                          --api-permissions b0afded3-3588-46d8-8b3d-9842eff778da=Role
az ad app permission admin-consent --id $clientId
# Grant Reports.Read.All API Permissions
az ad app permission add --id $clientId `
                          --api 00000003-0000-0000-c000-000000000000 `
                          --api-permissions 230c1aed-a721-4c5d-9cb4-a90514e508ef=Role
az ad app permission admin-consent --id $clientId
# Grant Sites.Read.All API Permissions
az ad app permission add --id $clientId `
                          --api 00000003-0000-0000-c000-000000000000 `
                          --api-permissions 332a536c-c7ef-4017-ab91-336970924f0d=Role
az ad app permission admin-consent --id $clientId
# Grant TermStore.Read.All API Permissions
az ad app permission add --id $clientId `
                         --api 00000003-0000-0000-c000-000000000000 `
                         --api-permissions ea047cc2-df29-4f3e-83a3-205de61f1791=Role
az ad app permission admin-consent --id $clientId
# Grant DeviceManagementApps.Read.All API Permissions
az ad app permission add --id $clientId `
                          --api 00000003-0000-0000-c000-000000000000 `
                          --api-permissions 7a6ee1e7-141e-4cec-ae74-d9db155731ff=Role
az ad app permission admin-consent --id $clientId
# Grant DeviceManagementConfiguration.Read.All API Permissions
az ad app permission add --id $clientId `
                          --api 00000003-0000-0000-c000-000000000000 `
                          --api-permissions dc377aa6-52d8-4e23-b271-2a7ae04cedf3=Role
az ad app permission admin-consent --id $clientId
# Grant DeviceManagementManagedDevices.Read.All API Permissions
az ad app permission add --id $clientId `
                          --api 00000003-0000-0000-c000-000000000000 `
                          --api-permissions 2f51be20-0bb4-4fed-bf7b-db946066c75e=Role
az ad app permission admin-consent --id $clientId
# Grant DeviceManagementServiceConfig.Read.All API Permissions
az ad app permission add --id $clientId `
                          --api 00000003-0000-0000-c000-000000000000 `
                          --api-permissions 06a5fe6d-c49d-46a7-b082-56b1b14103c7=Role
az ad app permission admin-consent --id $clientId
# Grant eDiscovery.Read.All API Permissions
az ad app permission add --id $clientId `
                          --api 00000003-0000-0000-c000-000000000000 `
                          --api-permissions 50180013-6191-4d1e-a373-e590ff4e66af=Role
az ad app permission admin-consent --id $clientId
# Grant InformationProtectionPolicy.Read API Permissions
az ad app permission add --id $clientId `
                          --api 00000003-0000-0000-c000-000000000000 `
                          --api-permissions 4ad84827-5578-4e18-ad7a-86530b12f884=Role
az ad app permission admin-consent --id $clientId
# Grant SecurityEvents.Read.All API Permissions
az ad app permission add --id $clientId `
                          --api 00000003-0000-0000-c000-000000000000 `
                          --api-permissions bf394140-e372-4bf9-a898-299cfc7564e5=Role
az ad app permission admin-consent --id $clientId
# Grant MailboxSettings.Read API Permissions
az ad app permission add --id $clientId `
                          --api 00000003-0000-0000-c000-000000000000 `
                          --api-permissions 40f97065-369a-49f4-947c-6a255697ae91=Role
az ad app permission admin-consent --id $clientId
# Create a new client secret
$clientSecret = az ad app credential reset --id $clientId `
--display-name "Chronom Read-Only Secret" `
--years 2 | ConvertFrom-Json
$clientSecretValue = $clientSecret.password
# Output the App Registration details
Write-Host
Write-Host "Application (client) ID: $clientId"
Write-Host "Directory (tenant) ID: $tenantId"
Write-Host "Client Secret Value: $clientSecretValue"
Next Steps
After adding your Azure Tenant and saving the details, Chronom will begin scanning your Microsoft 365 environment for license optimization opportunities.